Azure AD single sign-on
Log in to add to favouritesPage last updated 10 December 2024
Overview
You can integrate your Azure Active Directory (Azure AD) instance to help manage seamless single sign-on for the members of your organisation.
The following articles outline the process for configuring Azure AD, and how to setup Contensis to use this new configuration. They also cover testing the integration between the two systems.
These articles assume you have access and permission to your Azure portal along with system administrator access to Contensis.
Overview
Note: this article applies to app registrations created after October 2021(see this link for further details on Azure AD changes).
To be able to register Contensis CMS with Azure, you will first need to complete the following actions on Azure:
- Register a new application for each CMS instance
Register new applications for each Contensis CMS instance that will be integrated with Azure. For example, if you have a live and development instance you will need to register two applications, one for the live CMS url and one for the development CMS url. - Update the application manifest
Allows group integration and adds the application id url. - Update permissions
Allows user integration. - Obtain relevant federation data for the CMS
Obtaining credentials and discovery document data that is required to allow the Zengenti identity provider to federate with your registered Azure application.
Registering a new application
Go to the Azure portal and click ‘Azure Active Directory’ from the options in the left panel.
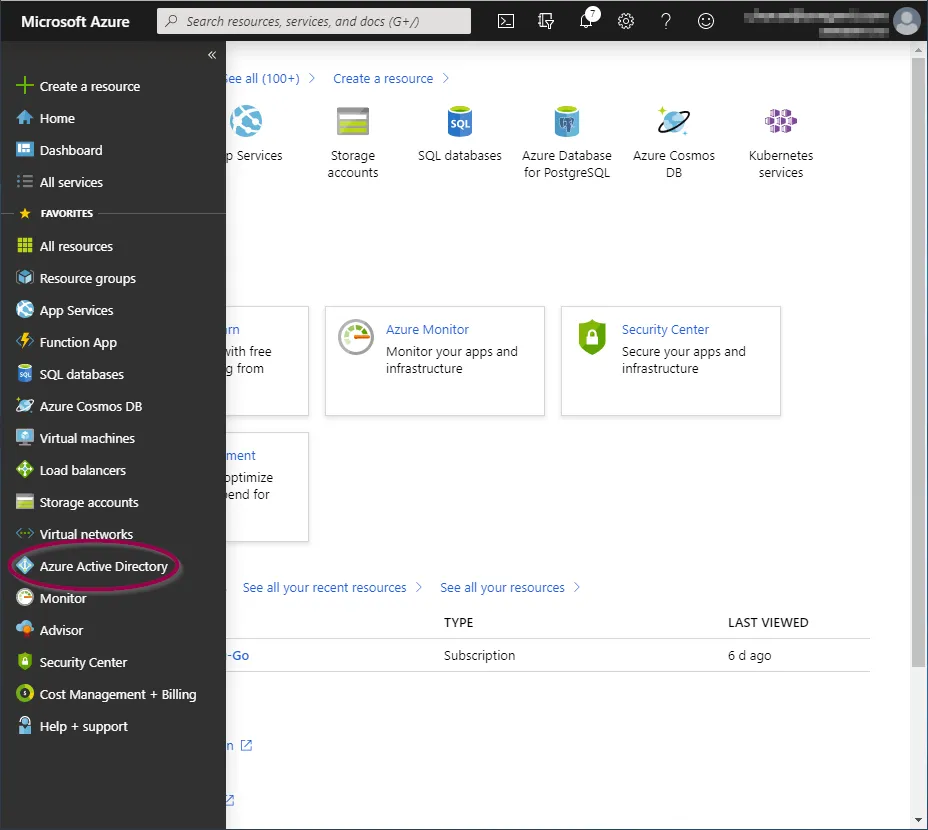
You will now be taken to the ‘Azure Active Directory Overview’ screen.
Click ‘App Registrations’ from the ‘Manage’ section.
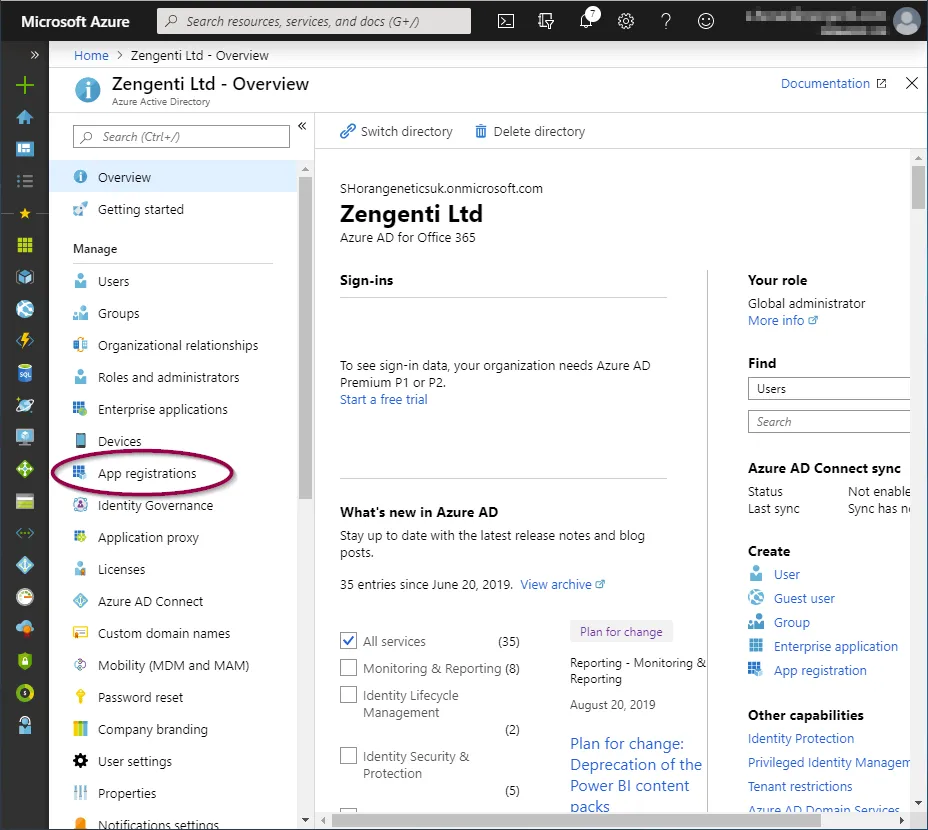
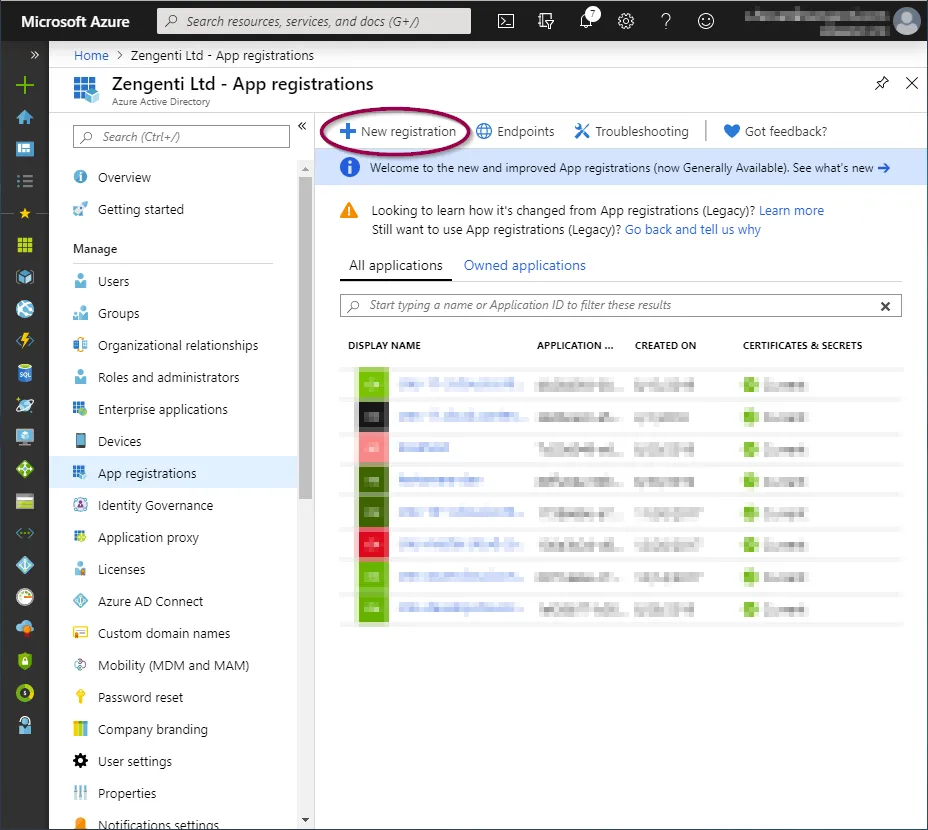
You now have the option to add a new registration.
Click ‘+ New registration’ in the toolbar.
You’ll be presented with a form allowing you to enter initial application registration information.
Name
This is the display name for the registration in your Azure portal, and can be anything of your choosing.
Supported Account Types
This defines the types of accounts the application grants permissions to.
Redirect URI
This is not optional and is a requirement for the Zengenti identity provider. It should be entered in the following format:
https://<your cms domain>/authenticate/
After completion, the form should look similar to the following:
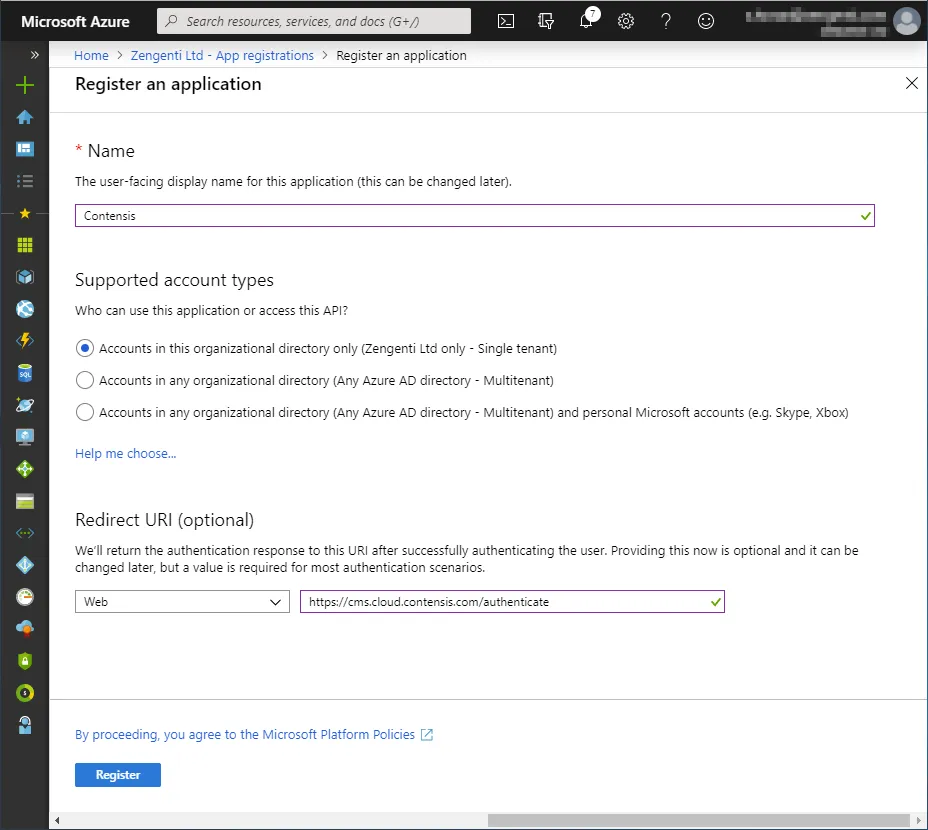
Click ‘Register’. The application is now registered.
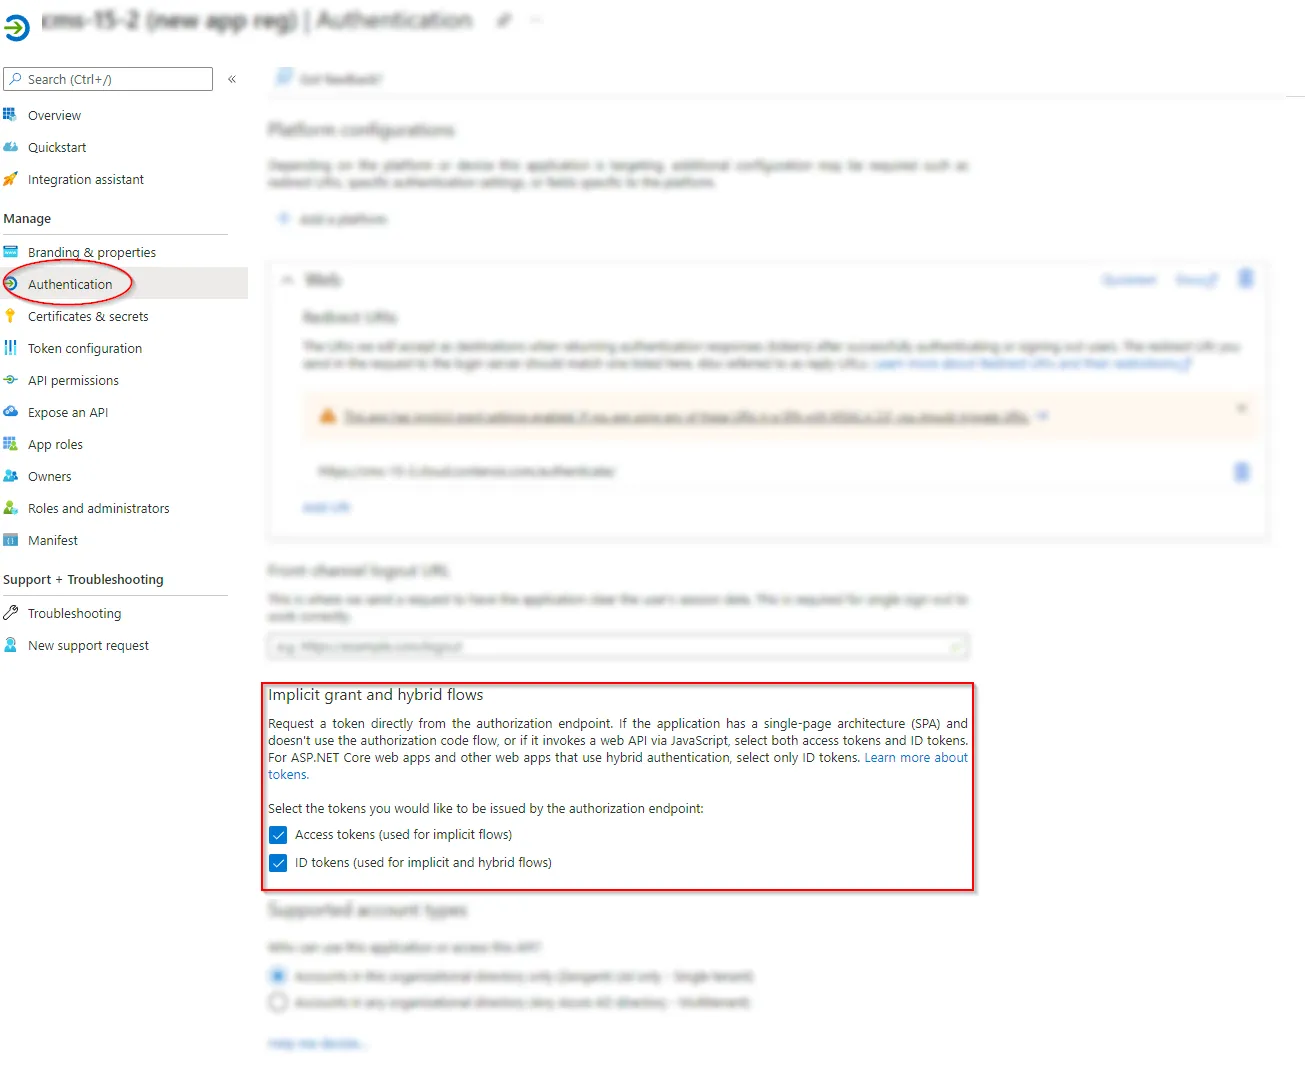
Update authentication options
The application needs to be updated to include additional authentication options.
Click ‘Authentication’ from the application overview and ensure 'Access tokens' and 'ID tokens' are selected in the Implicit grant and hybrid flows section:
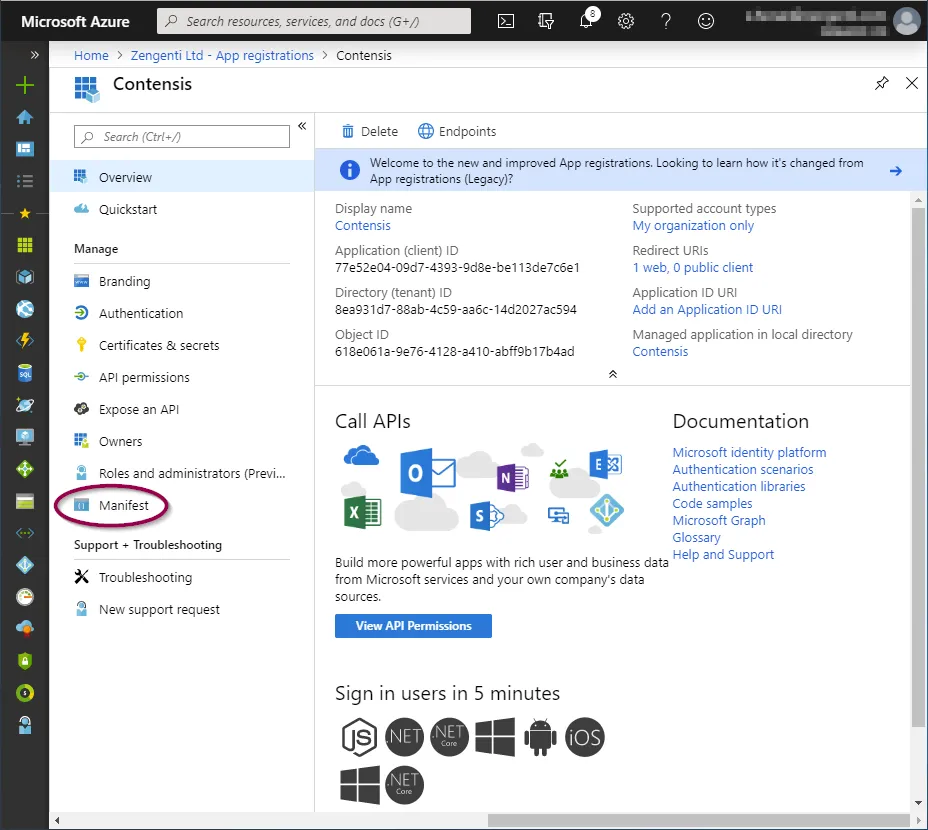
Update the application manifest
To allow the Zengenti identity provider to be able to identify itself, and process a user’s group membership, the application manifest must now be amended.
Click ‘Manifest’ from the application overview:
Update the ‘groupMembershipClaims’ value to ‘SecurityGroup’.
Click ‘Save’.
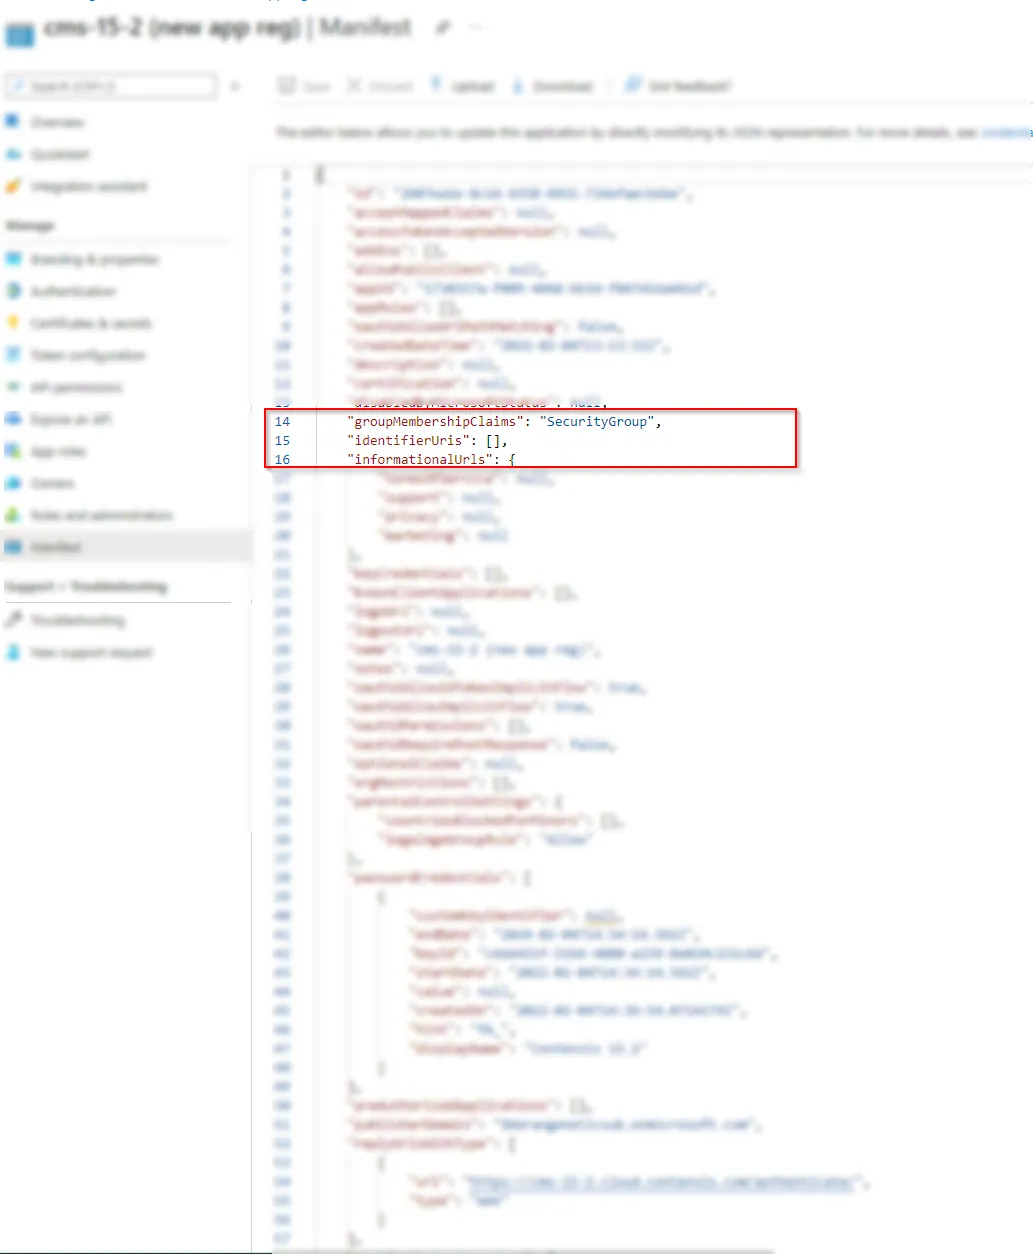
A message will display confirming that the manifest has been updated successfully.
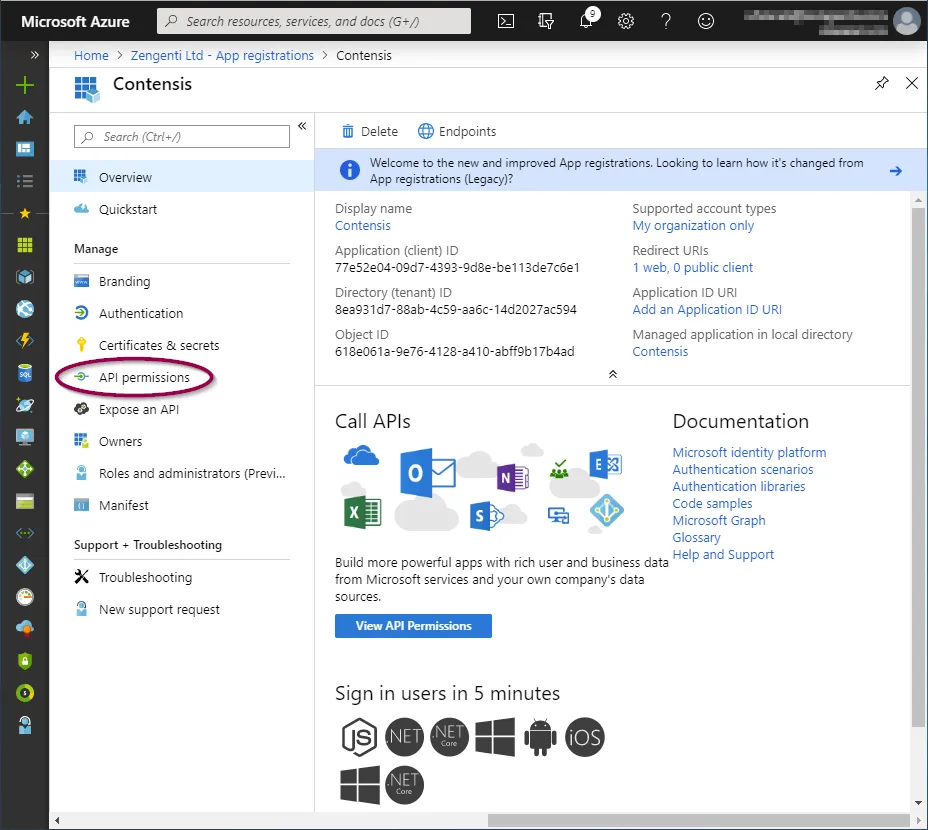
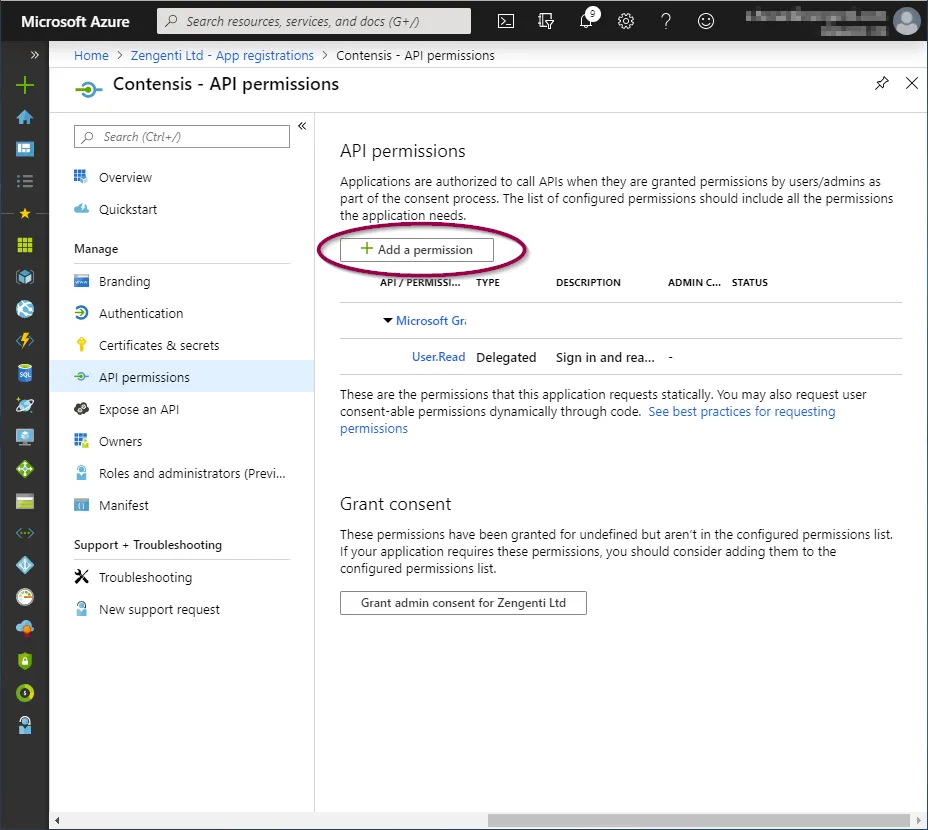
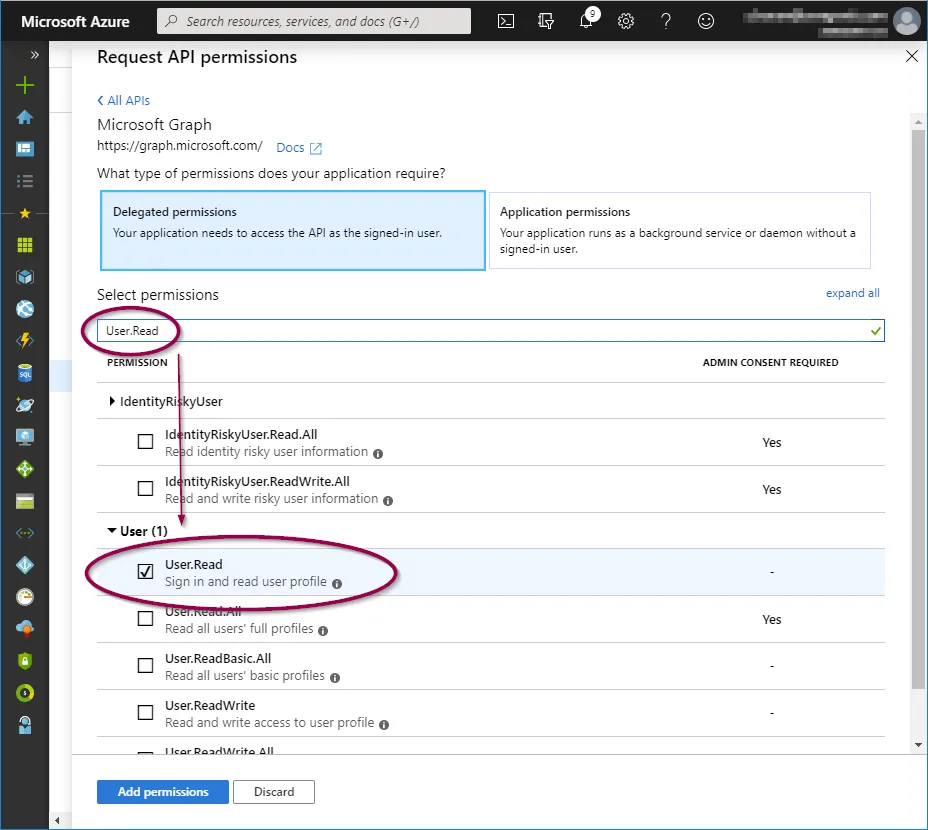
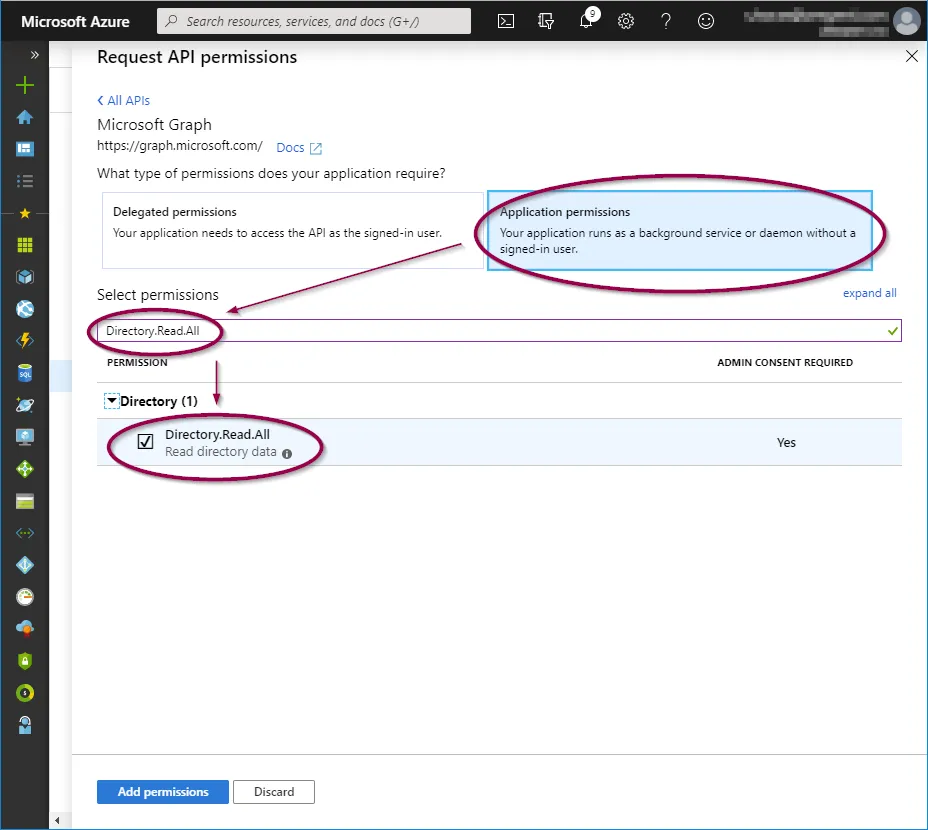
Click ‘API permissions’ and then click ‘+ Add a permission’.
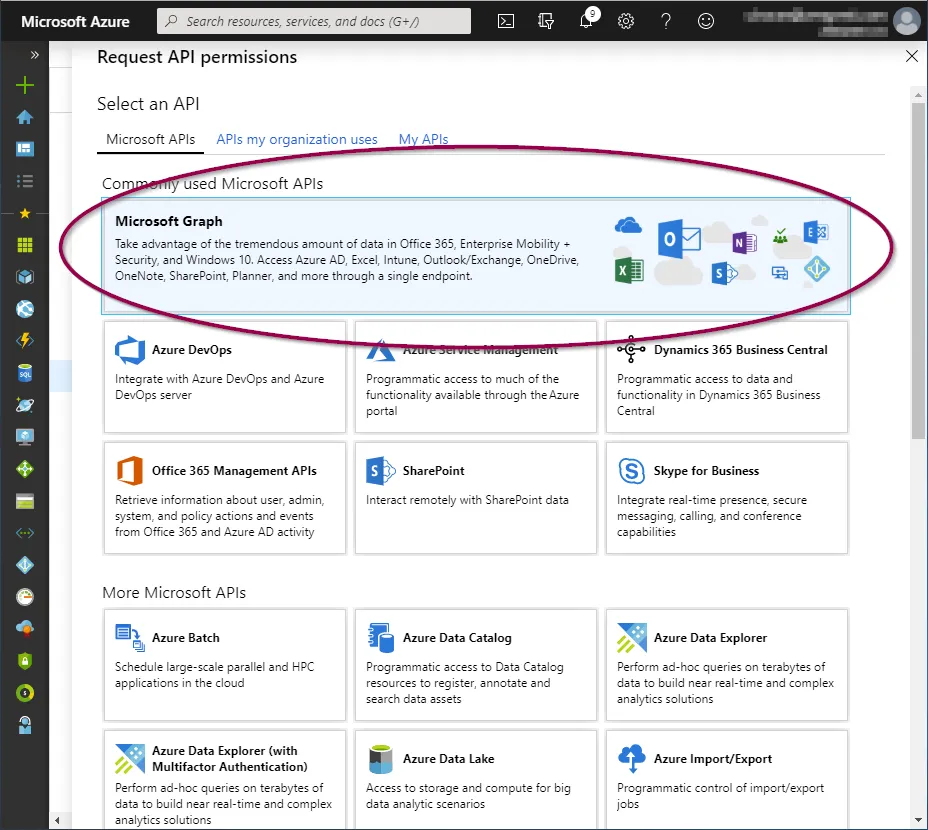
Click ‘Microsoft Graph’ from the top.
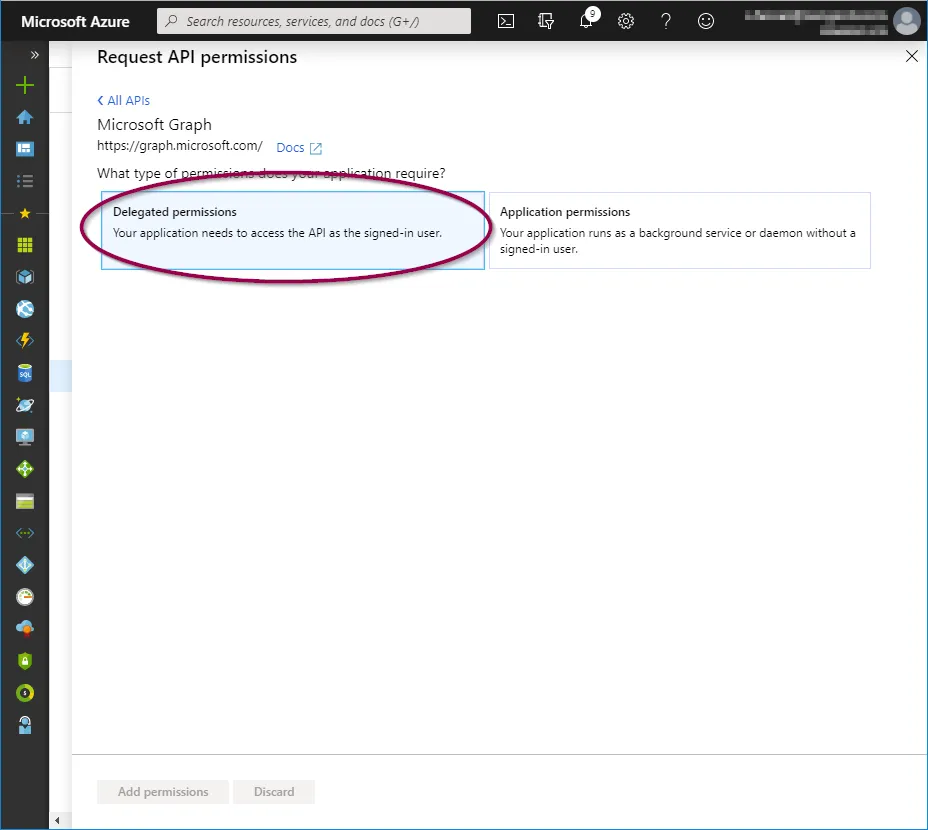
Now add the following permissions:
- Delegated permissions
- Directory.Read.All
- User.Read
- openid
- profile
- Application permissions
- Directory.Read.All
- User.Read.All
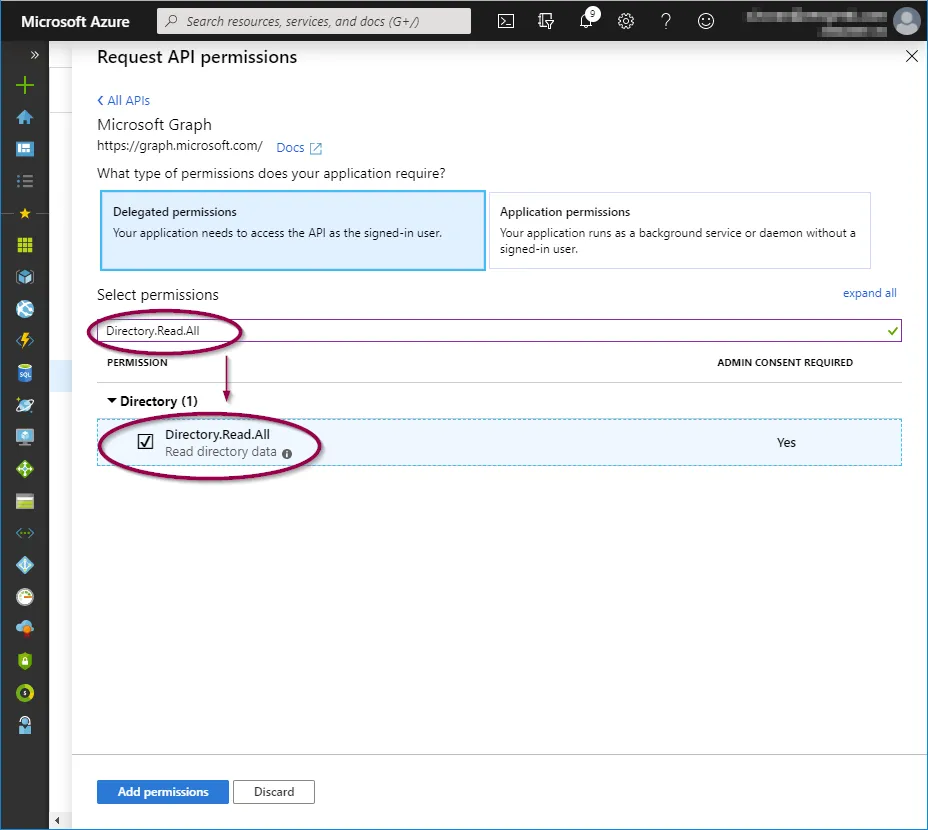
To add these, click on the relevant permission type and copy/paste the permission as listed above into the search field, then check the permission as shown below:
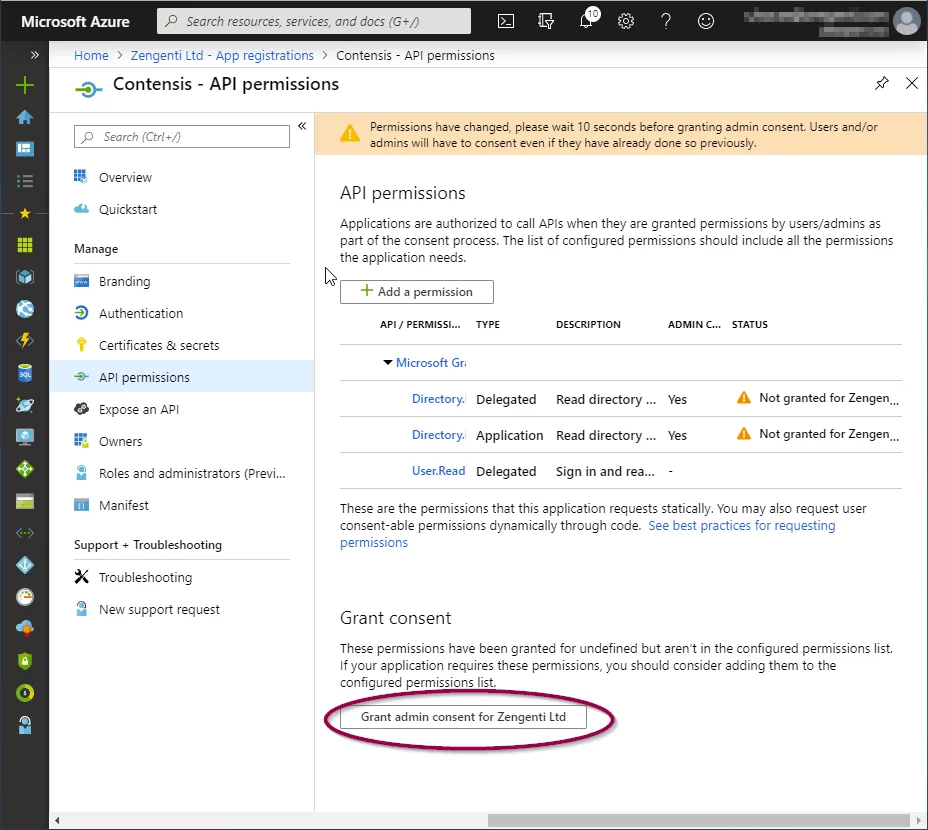
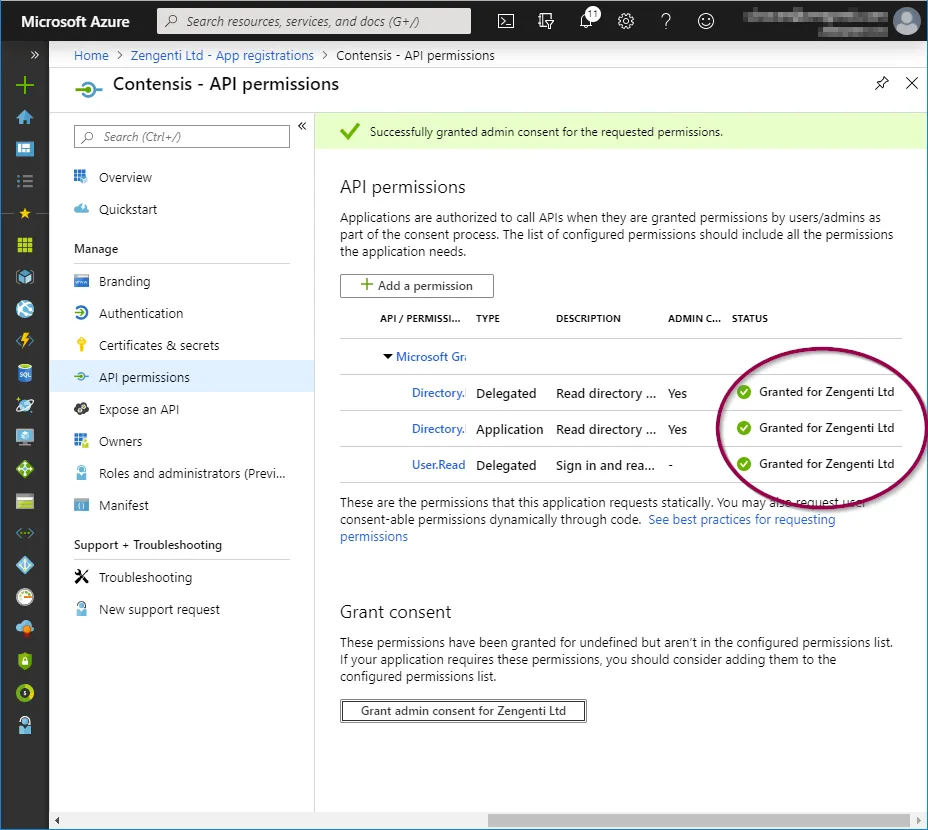
When the three permission options have been selected, click ‘Add permissions’.
This will take you back to the API permissions page, where a warning relating to changed permissions will be visible.
To allow the permissions to be available for the Zengenti identity provider, you must grant admin access. Click ‘Grant admin consent’ at the bottom of the page.
A further warning will then display - click ‘Yes’.
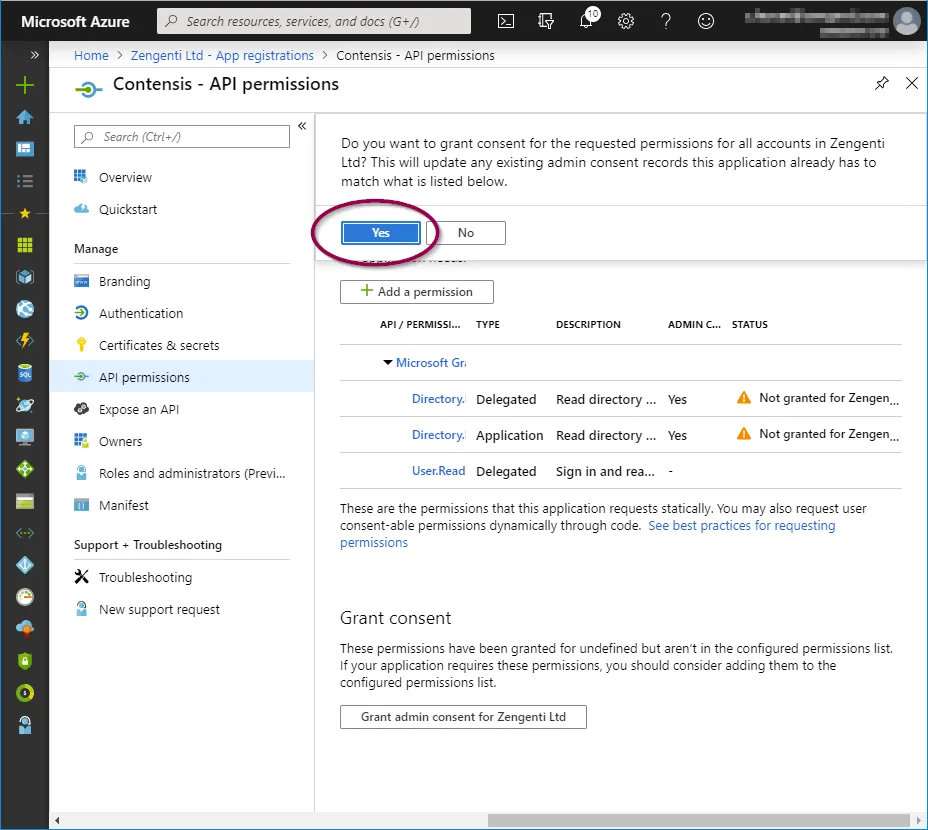
A success message will display, together with details of the permissions granted.
Setting up admin consent requests (optional)
If the user that will log in into Contensis CMS for the very first time after registration does not have Azure AD global admin permissions you need an additional step to enable admin consent requests.
Go to “Azure Active Directory” > "Enterprise applications" and on the left menu, there is a 'User settings' entry that has an Admin consent requests section. This section needs to be enabled as follows and should have a user, group or role selected that will receive notifications for admin consent via email. The admin consent needs to be granted once per lifetime of the application.

Obtain relevant federation data for the CMS
The Zengenti identity provider requires the following information to federate with your Azure instance:
- Metadata endpoint
- Application id
- Tenant id
- Tenant name
- Application key
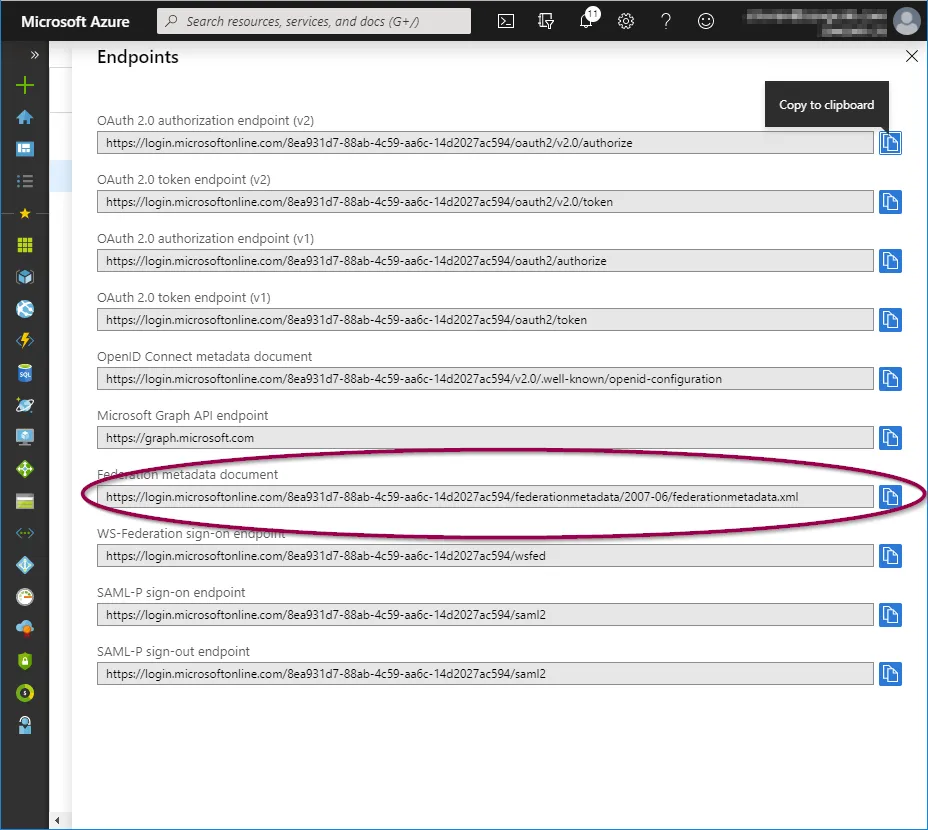
Metadata endpoint
Go to “Azure Active Directory” > App Registrations
e.g. Home > Zengenti Ltd > App Registrations
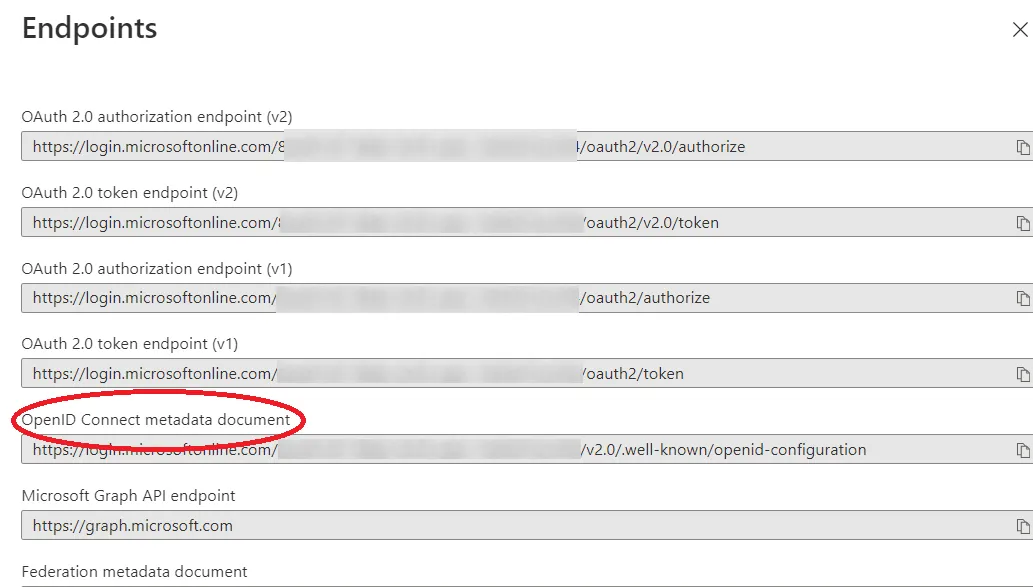
Click ‘Endpoints’ in the top bar.
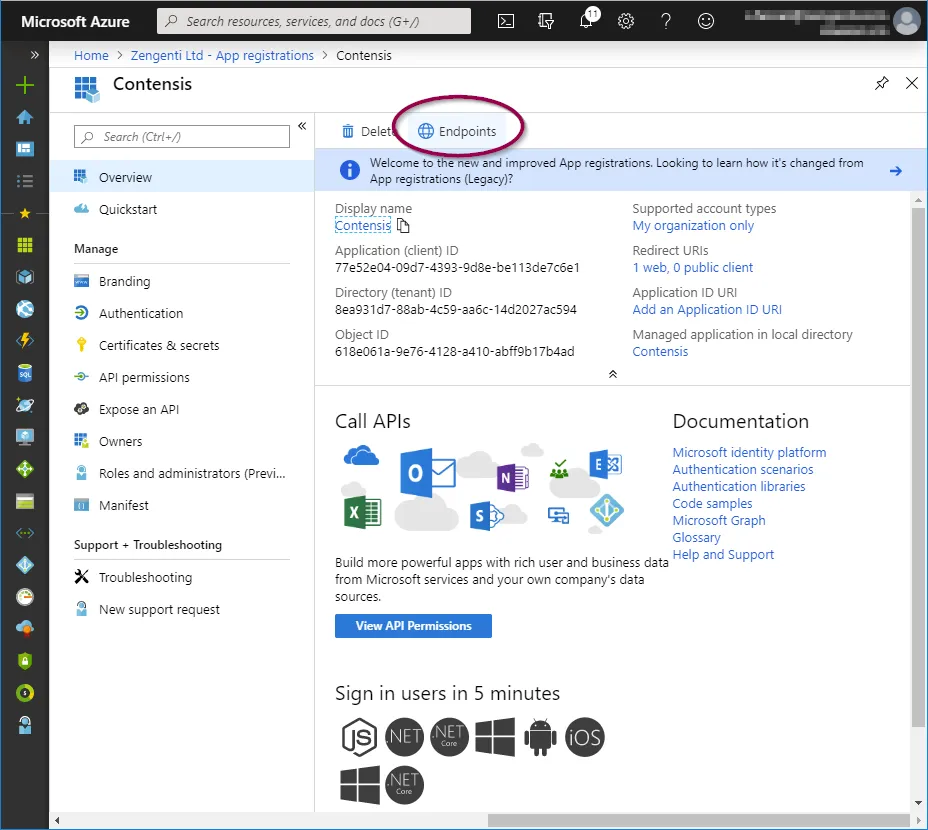
You will see a list of available application endpoints.
Copy the link for ‘OpenID Connect metadata document’

Application id
Click ‘Overview’ in the application options pane and then copy the ‘Application (client) ID’ which will be required when configuring Contensis to use your Azure AD instance.

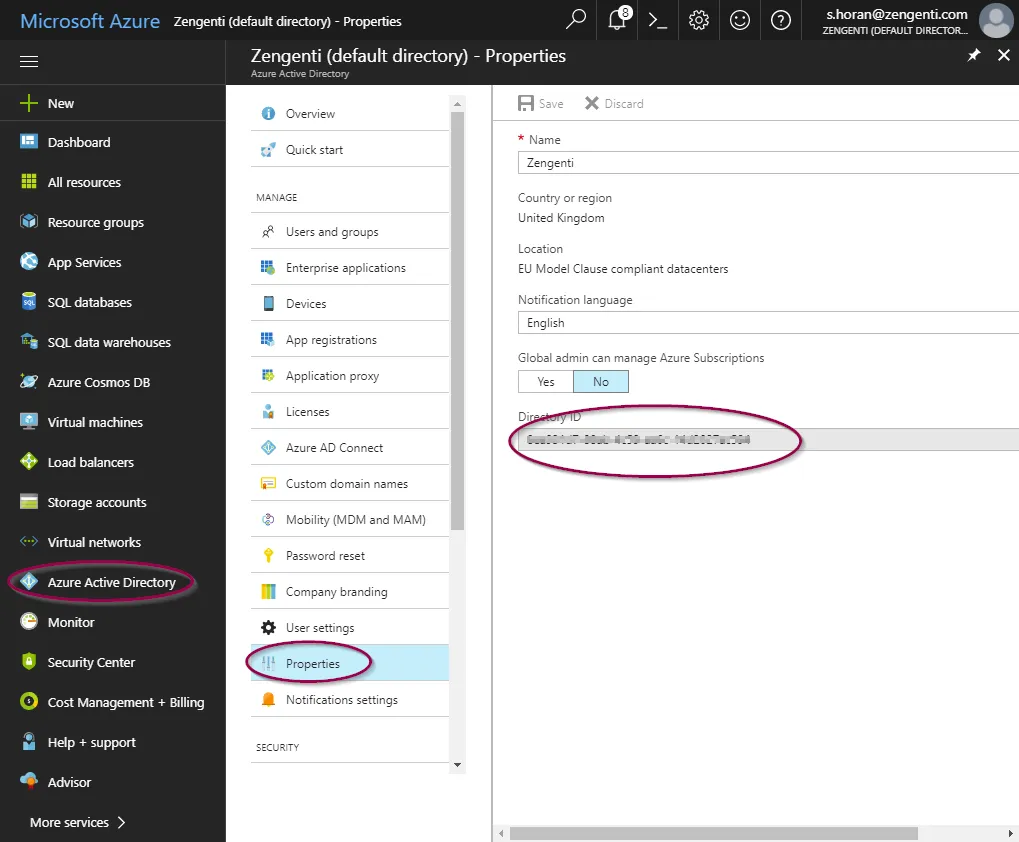
Tenant id
In the ‘Overview’ screen, copy the 'Directory (tenant) ID’ which will be required when configuring Contensis to use your Azure AD instance.
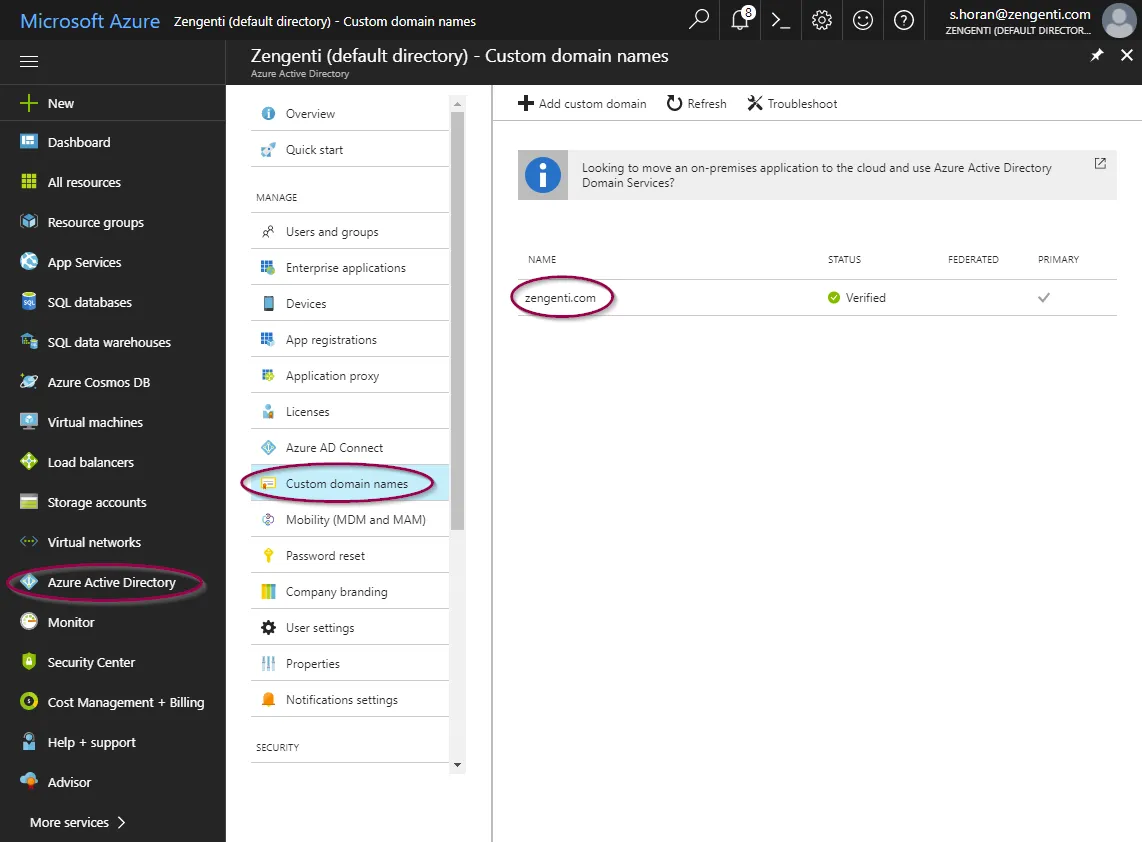
Tenant name
Select ‘Azure Active Directory’ from the panel on the left, and then ‘Custom Domain Names’. You can then copy the ‘Name’ listed as the ‘Primary’ - this is your tenant name and will be required when configuring Contensis to use your Azure AD instance.

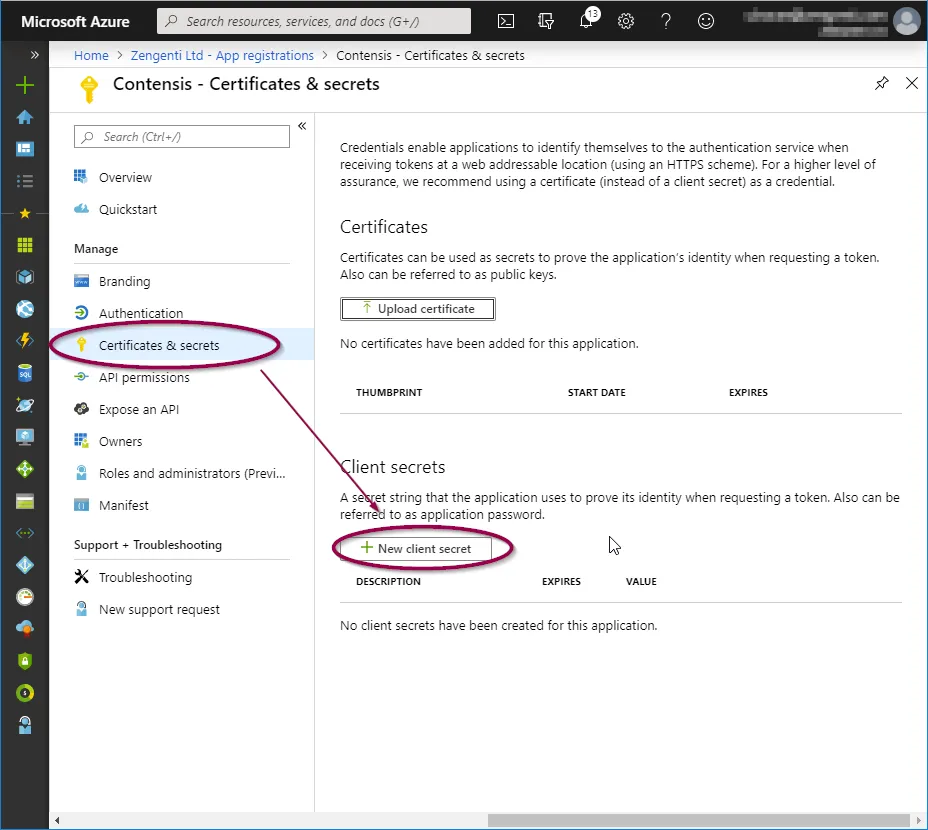
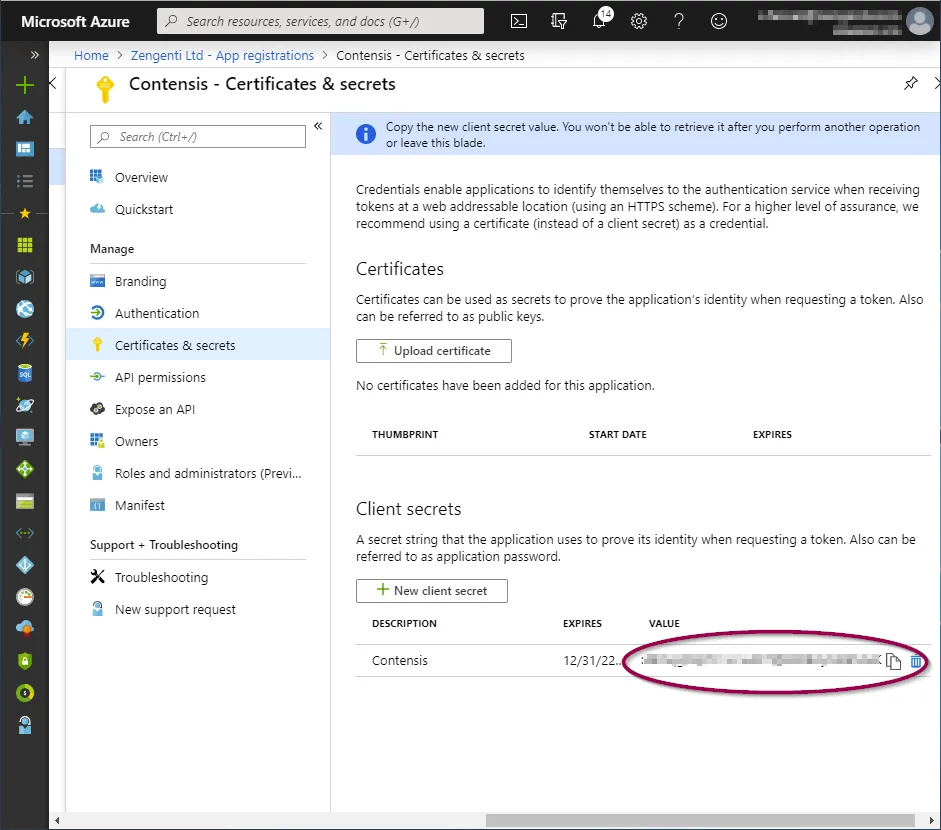
Application key
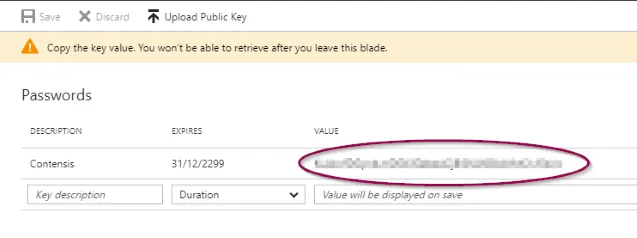
In the application overview panel, click ‘Certificates & secrets’ and then click ‘+ New client secret’.
You will see a form for naming and choosing the lifespan of a key. Complete as appropriate for your requirements, then click ‘Add’.
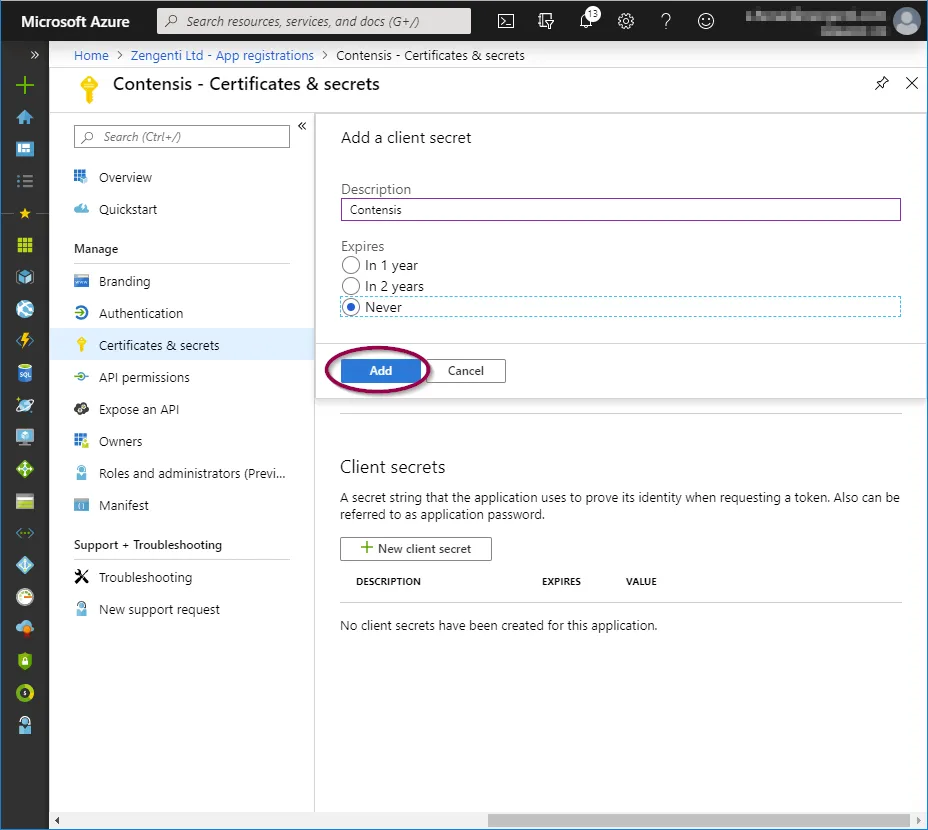
You will now need to copy the key as directed before navigating away from this screen. Click the ‘Copy to clipboard’ icon.
Once you leave this screen or carry out any other action, you will no longer be able to retrieve this key value.
You have now completed the registration of Contensis with Azure and are now ready to configure Contensis to use Azure AD.
Register Contensis with Azure AD (for legacy app registrations created before October 2021)
Overview
Note: this article applies to app registrations created before October 2021 or that have the Contensis CMS domain (e.g. cloud.contensis.com) verified in the Azure portal (see this link for further details).
To be able to register Contensis CMS with Azure, you will first need to complete the following actions on Azure:
- Register a new application for each CMS instance
Register new applications for each Contensis CMS instance that will be integrated with Azure. For example, if you have a live and development instance you will need to register two applications, one for the live CMS url and one for the development CMS url. - Update the application manifest
Allows group integration and adds the application id url. - Update permissions
Allows user integration. - Obtain relevant federation data for the CMS
Obtaining credentials and discovery document data that is required to allow the Zengenti identity provider to federate with your registered Azure application.
Registering a new application
Go to the Azure portal and click ‘Azure Active Directory’ from the options in the left panel.
You will now be taken to the ‘Azure Active Directory Overview’ screen.
Click ‘App Registrations’ from the ‘Manage’ section.
You now have the option to add a new registration.
Click ‘+ New registration’ in the toolbar.
You’ll be presented with a form allowing you to enter initial application registration information.
Name
This is the display name for the registration in your Azure portal, and can be anything of your choosing.
Supported Account Types
This defines the types of accounts the application grants permissions to.
Redirect URI
This is not optional and is a requirement for the Zengenti identity provider. It should be entered in the following format:
https://<your cms domain>/authenticate
After completion, the form should look similar to the following:
Click ‘Register’. The application is now registered.
Update the application manifest
To allow the Zengenti identity provider to be able to identify itself, and process a user’s group membership, the application manifest must now be amended.
Click ‘Manifest’ from the application overview:
Update the ‘groupMembershipClaims’ value to ‘SecurityGroup’ , then add the application id url in the form of ‘https://<your domain>/authenticate’, as shown below.
Click ‘Save’.

A message will display confirming that the manifest has been updated successfully.
Click ‘API permissions’ and then click ‘+ Add a permission’.
Click ‘Microsoft Graph’ from the top.
Now add the following permissions:
- Delegated permissions
- Directory.Read.All
- User.Read
- Application permissions
- Directory.Read.All
To add these, click on the relevant permission type and copy/paste the permission as listed above into the search field, then check the permission as shown below:
When the three permission options have been selected, click ‘Add permissions’.
This will take you back to the API permissions page, where a warning relating to changed permissions will be visible.
To allow the permissions to be available for the Zengenti identity provider, you must grant admin access. Click ‘Grant admin consent’ at the bottom of the page.
A further warning will then display - click ‘Yes’.
A success message will display, together with details of the permissions granted.
Obtain relevant federation data for the CMS
The Zengenti identity provider requires the following information to federate with your Azure instance:
- Metadata endpoint
- Application id
- Tenant id
- Tenant name
- Application key
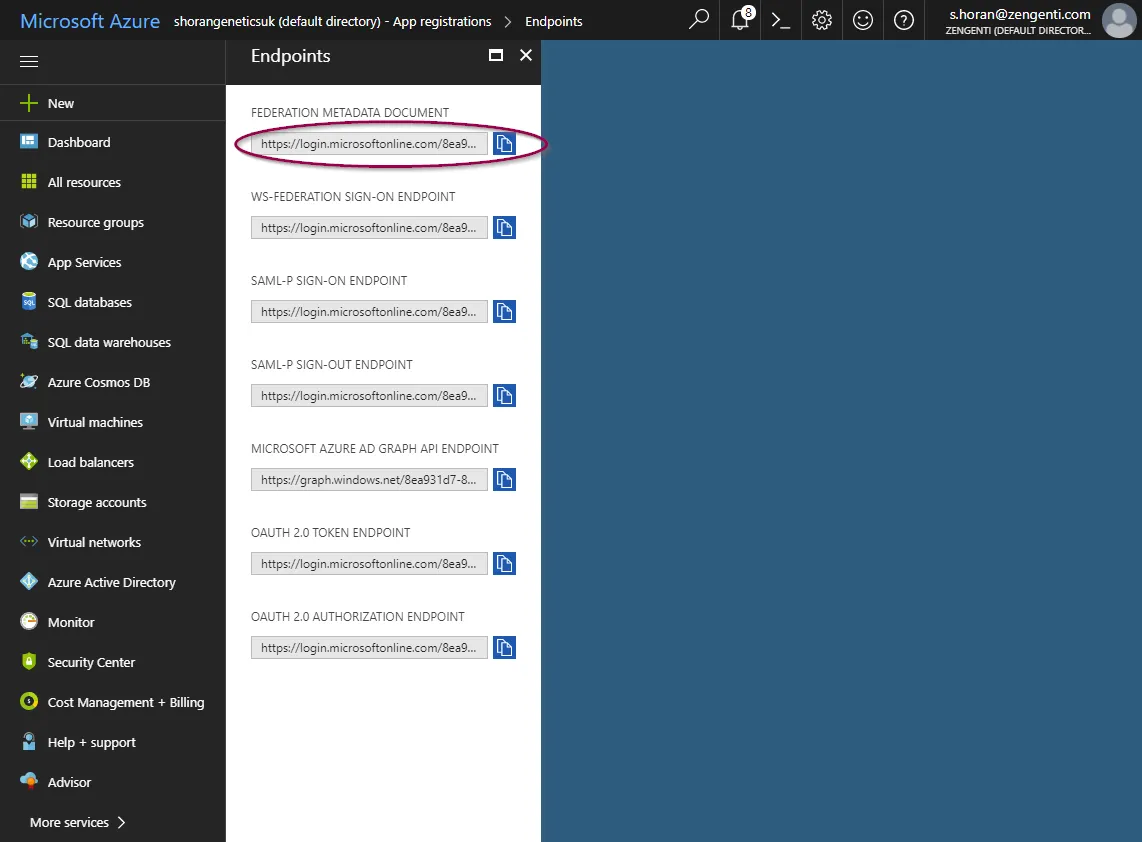
Metadata endpoint
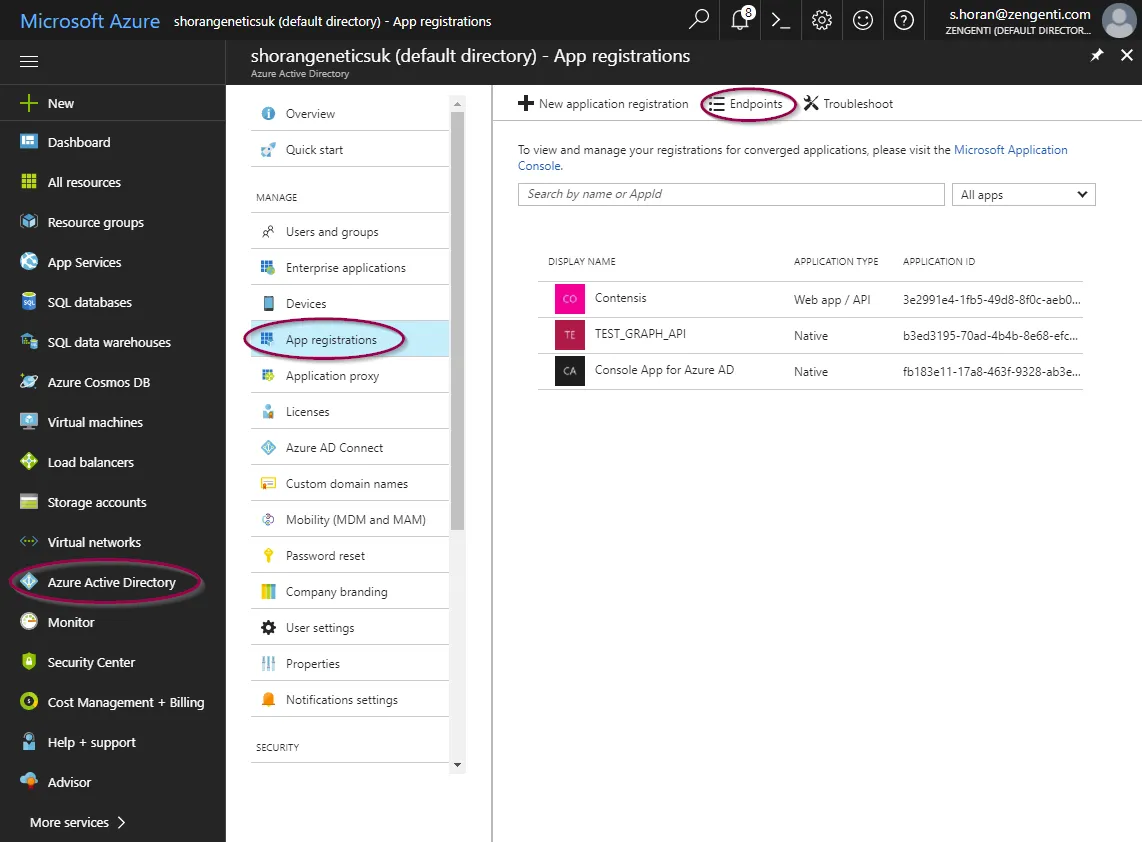
Go to “Azure Active Directory” > App Registrations
e.g. Home > Zengenti Ltd > App Registrations
Click ‘Endpoints’ in the top bar.
You will see a list of available application endpoints.
Copy the link for ‘Federation metadata document’
Application id
Click ‘Overview’ in the application options pane and then copy the ‘Application (client) ID’ which will be required when configuring Contensis to use your Azure AD instance.
Tenant id
In the ‘Overview’ screen, copy the 'Directory (tenant) ID’ which will be required when configuring Contensis to use your Azure AD instance.
Tenant name
Select ‘Azure Active Directory’ from the panel on the left, and then ‘Custom Domain Names’. You can then copy the ‘Name’ listed as the ‘Primary’ - this is your tenant name and will be required when configuring Contensis to use your Azure AD instance.
Application key
In the application overview panel, click ‘Certificates & secrets’ and then click ‘+ New client secret’.
You will see a form for naming and choosing the lifespan of a key. Complete as appropriate for your requirements, then click ‘Add’.
You will now need to copy the key as directed before navigating away from this screen. Click the ‘Copy to clipboard’ icon.
Once you leave this screen or carry out any other action, you will no longer be able to retrieve this key value.
You have now completed the registration of Contensis with Azure and are now ready to configure Contensis to use Azure AD.
Configure Contensis to use Azure AD
- With your Contensis application registered in Azure AD, the next step is to login to Contensis and configure the Azure AD integration.
- Login to Contensis using an administrative account.
- Navigate to the Management Console and select Global Settings, you need to enter the following settings:
- Select Azure Active Directory, followed by App Registrations and then select Endpoints from the top toolbar.
- Update the WSFederation_MetadataEndpoint global setting. The value for this is different depending on whether you are using the current Azure AD configuration (WSFederation_Type=3) or the legacy configuration (WSFederation_Type =2):
- Legacy Azure AD configuration (WSFederation_Type =2): Copy the Federation Metadata Document address from the textbox.
- Current Azure AD configuration (WSFederation_Type =3): Copy the OpenID Connect metadata document address from the textbox
WsFederation_AzureTenantID
This needs to be set to your Azure AD tenant ID. This can be found by following these steps:
- Select Azure Active Directory, followed by Properties. Your tenant ID is the same as your Directory ID. Enter this in the WSFederation_TenantID global setting.
WsFederation_AzureTenantName
This needs to be set to your Azure AD tenant name. This can be found by following these steps:
- Select Azure Active Directory, followed by Custom domain names. Your tenant name is the name of your primary domain. Enter this in the WSFederation_TenantName global setting.
WsFederation_AzureApplicationID
This needs to be set to the application ID of the registered Contensis app in Azure. This can be found by following these steps:
- Select Azure Active Directory, followed by App registrations then select the Contensis application. Your application ID is listed on the application overview. Enter this in the WSFederation_ApplicationID global setting.

WsFederation_AzureApplicationKey
- Navigate to your application and click All settings and then select Keys from the secondary menu.
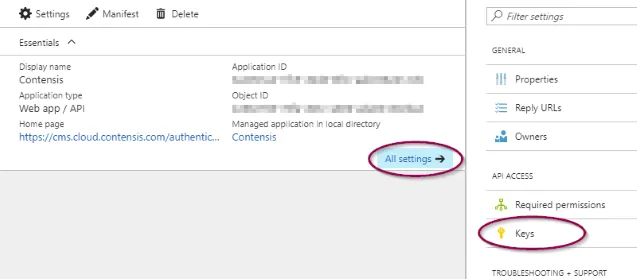
- Enter a description, choose an expiration and then click Save.
Once you navigate away from this screen you will not be able to retrieve the key again. In the event that you lose the key value then you will need to delete the key and add a new one.
- Enter the value of the key into the WSFederation global setting.
WSFederation_Type
This needs to be set to 2 for Azure AD accounts created before October 2021, and to 3 for any created later.
Final step
Our support team will need to apply these changes for you. Please raise a help desk ticket to arrange this.
Test Azure AD single sign-on in Contensis
Once you have registered Contensis with Azure AD and set up Azure AD in Contensis, you should see a new Sign in with Azure AD button on the Contensis login screen.
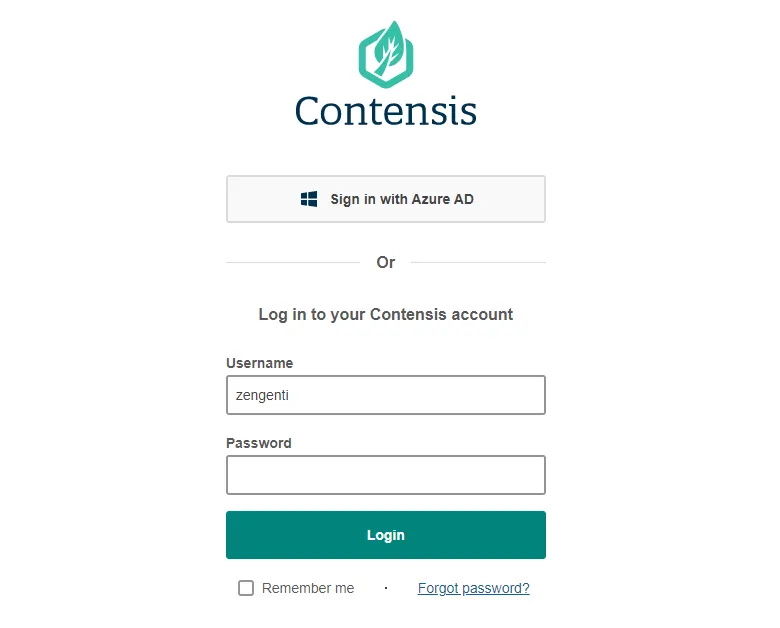
Press Sign in with Azure AD to be redirected to your Azure AD logon screen.

- Enter your email and press Next. Follow the on-screen instructions and you will be logged into Contensis.
If this is the first time a user has logged in, a user will be created in Contensis with a username which matches their AD username. If a Contensis user already exists with the same user name, then the user will be converted to an AD user. No permissions or group assignments will be lost.
All users created via an Azure AD login are added to a system group called AD Users, this enables you to give the AD Users some default permissions.
Troubleshoot Azure AD login problems
f you are having problems logging in using Azure AD then here are some things you might want to check are configured correctly and a debug step you could try.
CMS URL
- In the Management Console navigate to Global Settings.
- Look up the ContensisGuiURL setting and check if the Setting Value has https:// defined at the start of it (non-https will not work).
Contensis registration with Azure AD
Has Contensis been registered correctly with Azure AD? Double check that all steps have been carried out correctly in the Register Contensis with Azure AD article.
CMS settings
- In the Management Console navigate to Global Settings and make sure that all settings have been set correctly by following the Configure Contensis to use AD FS article.
- Double check that you can access the metadata endpoint specified in the global setting WsFederation_MetadataEndpoint. To do this you can logon to the CMS server and run the following command in PowerShell:
Invoke-WebRequest https://adfs.contensis.com/FederationMetadata/2007-06/FederationMetadata.xml - UseBasicParsing
If the metadata endpoint is configured correctly you should get a StatusCode of 200 and the Content will start with <EntityDescriptor....
Machine.config machinekey validation
- Open the machine.config file on your CMS server. It can be found in c:\Windows\Microsoft.NET\Framework64\v4.0.30319\Config
- Search for the following <machineKey>, you will see something like:
<machineKey validationKey="E1D4A7ACE716CC17B9BE3F1794AB117E7CB771B878253727" decryptionKey="E8969B07BF46F3FF659E008495F1EA5163EBDC0E50B6024E" validation="SHA1"/>
Make sure that the validation property is set to SHA1 and not anything else. If it is set to something else, change it and then restart IIS.
Debug using verbose logging
Follow the steps below to setup tracing on IdentityServer and then attempt to login using Azure AD or logout. Any issues should be seen in the logs.
Set up tracing on IdentityServer
- Add the xml above to the web.config file for the CMS instance, change the Contensis_DebugInfoLevel to Debug in the web.config.
- Ensure that the CMS has access to the directory specified in the initializeData setting.
- Save web.config.