Getting started with Contensis using the .Net Management API
Log in to add to favouritesPage last updated 11 December 2024
The Contensis Management API allows you to import and manage content within content types and entries. This guide will walk you through the process of creating and publishing entries using a simple .Net console app. We'll cover setting up your environment, making API requests, and publishing data using the .Net Management API.
✔️ Prerequisites
- Basic command line interface knowledge
- Either Visual Studio or VS Code
Visual Studio
- Visual Studio 2022 with the ASP.NET and web development workload.
VS Code
Setting up your environment 🌳
First, let's create a new folder for our project, and navigate into it using the command line.
Depending on your operating system, open Terminal (on macOS and Linux) or Command Prompt (on Windows), and enter the following commands:
mkdir contensis-dot-net
cd contensis-dot-net
Using a .Net template 🏗️
Now that we have a folder for our project, let's initialise a new project template inside it. Using the dotnet new console command sets up the basic structure and files needed for a program that runs in a command line, which is perfect for what we are trying to achieve here.
dotnet new console- Now load up your preferred IDE or simply use
code .in the terminal. - Once you've got the project open the
Program.csfile. This is where the main code resides, so let's begin here.
Creating our application 💻
Let's clear out the contents of Program.cs and replace it with the following snippet:
using System;
using Zengenti.Contensis.Management;
using DotNetEnv;

namespace CreateEntries
{
    class Program
    {
        static void Main()
        {

        }
    }
}
We're using several packages here – let's make sure to install them.
dotnet add package Zengenti.Contensis.Management
dotnet add package DotNetEnv
Setting up the client 🧰
We now need to initialise our client so we can make API calls. We do this by providing our ALIAS, CLIENT_ID and CLIENT_SECRET.
Paste the following code snippet inside the static void Main(){} block.
        // Load the .env file into environment variables
        DotNetEnv.Env.Load();

        // Client Initlisation
        var client = ManagementClient.Create(
            rootUrl: string.Format("https://api-{0}.cloud.contensis.com", DotNetEnv.Env.GetString("ALIAS")),
            clientId: DotNetEnv.Env.GetString("CLIENT_ID"),
            sharedSecret: DotNetEnv.Env.GetString("CLIENT_SECRET")
        );
Creating our API key 🔑
In the previous snippet, you might have noticed that we are retrieving environment variables from our .env file. Let's go through the process of configuring our .env file step by step:
- Start by creating an empty
.envfile in the root directory of your project. - Our .env will store the Client ID and Client Secret for the API key we'll use to access our Contensis environment, but first we need to create a new API key. Create an account with Contensis or log in.
- Navigate to your account dashboard and launch your free trial environment. (If you don't have a free trial, you can request one here).
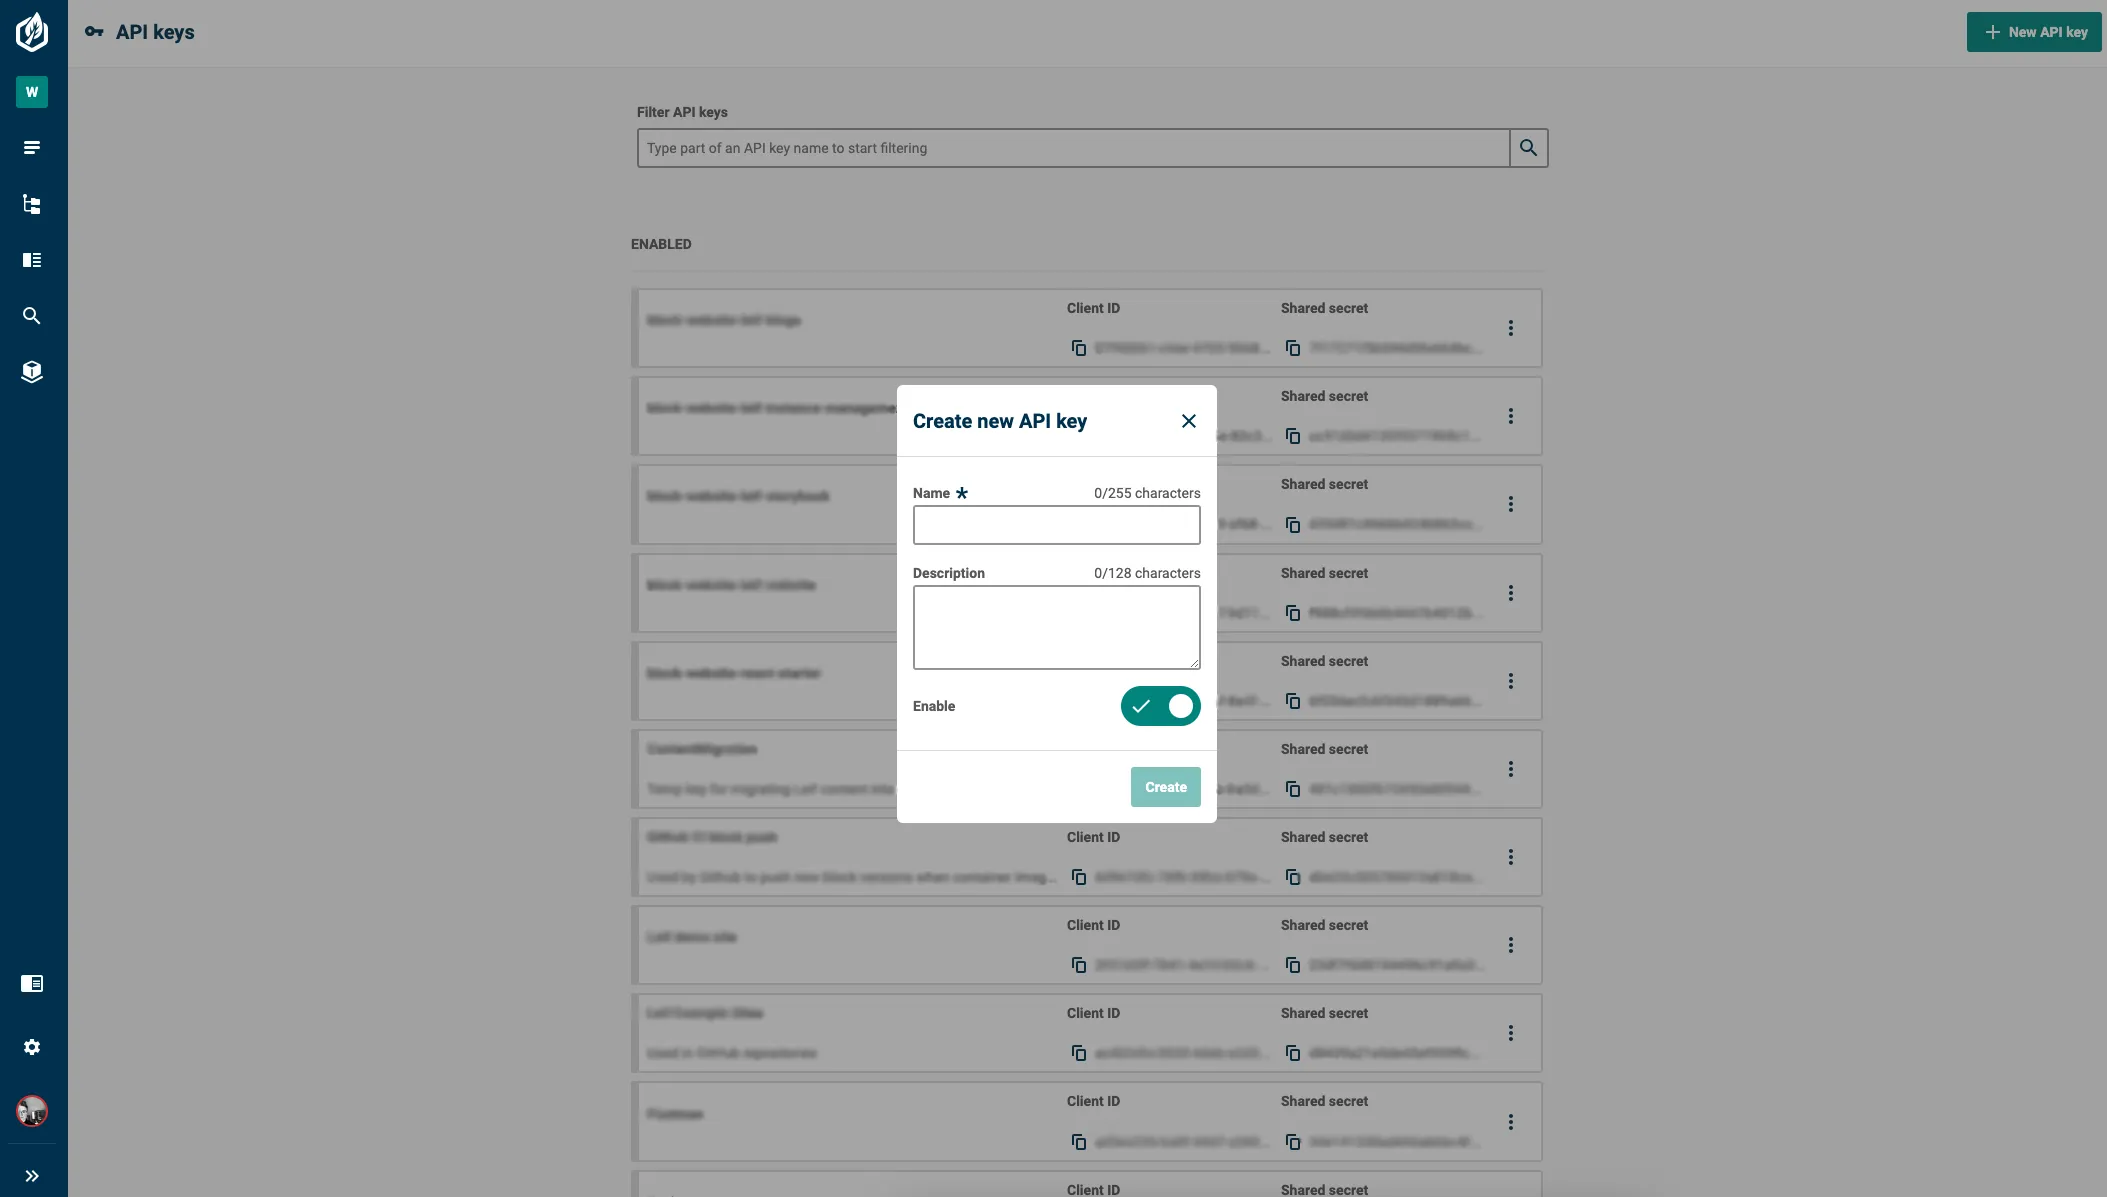
- Go to Settings > API Keys in your Contensis project.
- Press the New API Key button in the top-right corner to create a new API key. Give it a descriptive name and remember to jot down the key – you'll need it later.
- We now need to update the
.envfile with the credentials for our API key. Copy the client ID and client secret provided by the CMS. Store them in your.envfile like this:
CLIENT_ID= {your client ID}

CLIENT_SECRET= {your shared secret}- Save the changes to your
.envfile.
Configuring your PROJECT_API_ID and ALIAS ⚙️
To keep things secure and flexible, we need to put our variables in the .env file. Storing them in the .env file improves security and makes it simpler to tweak them without dealing with the crux codebase.
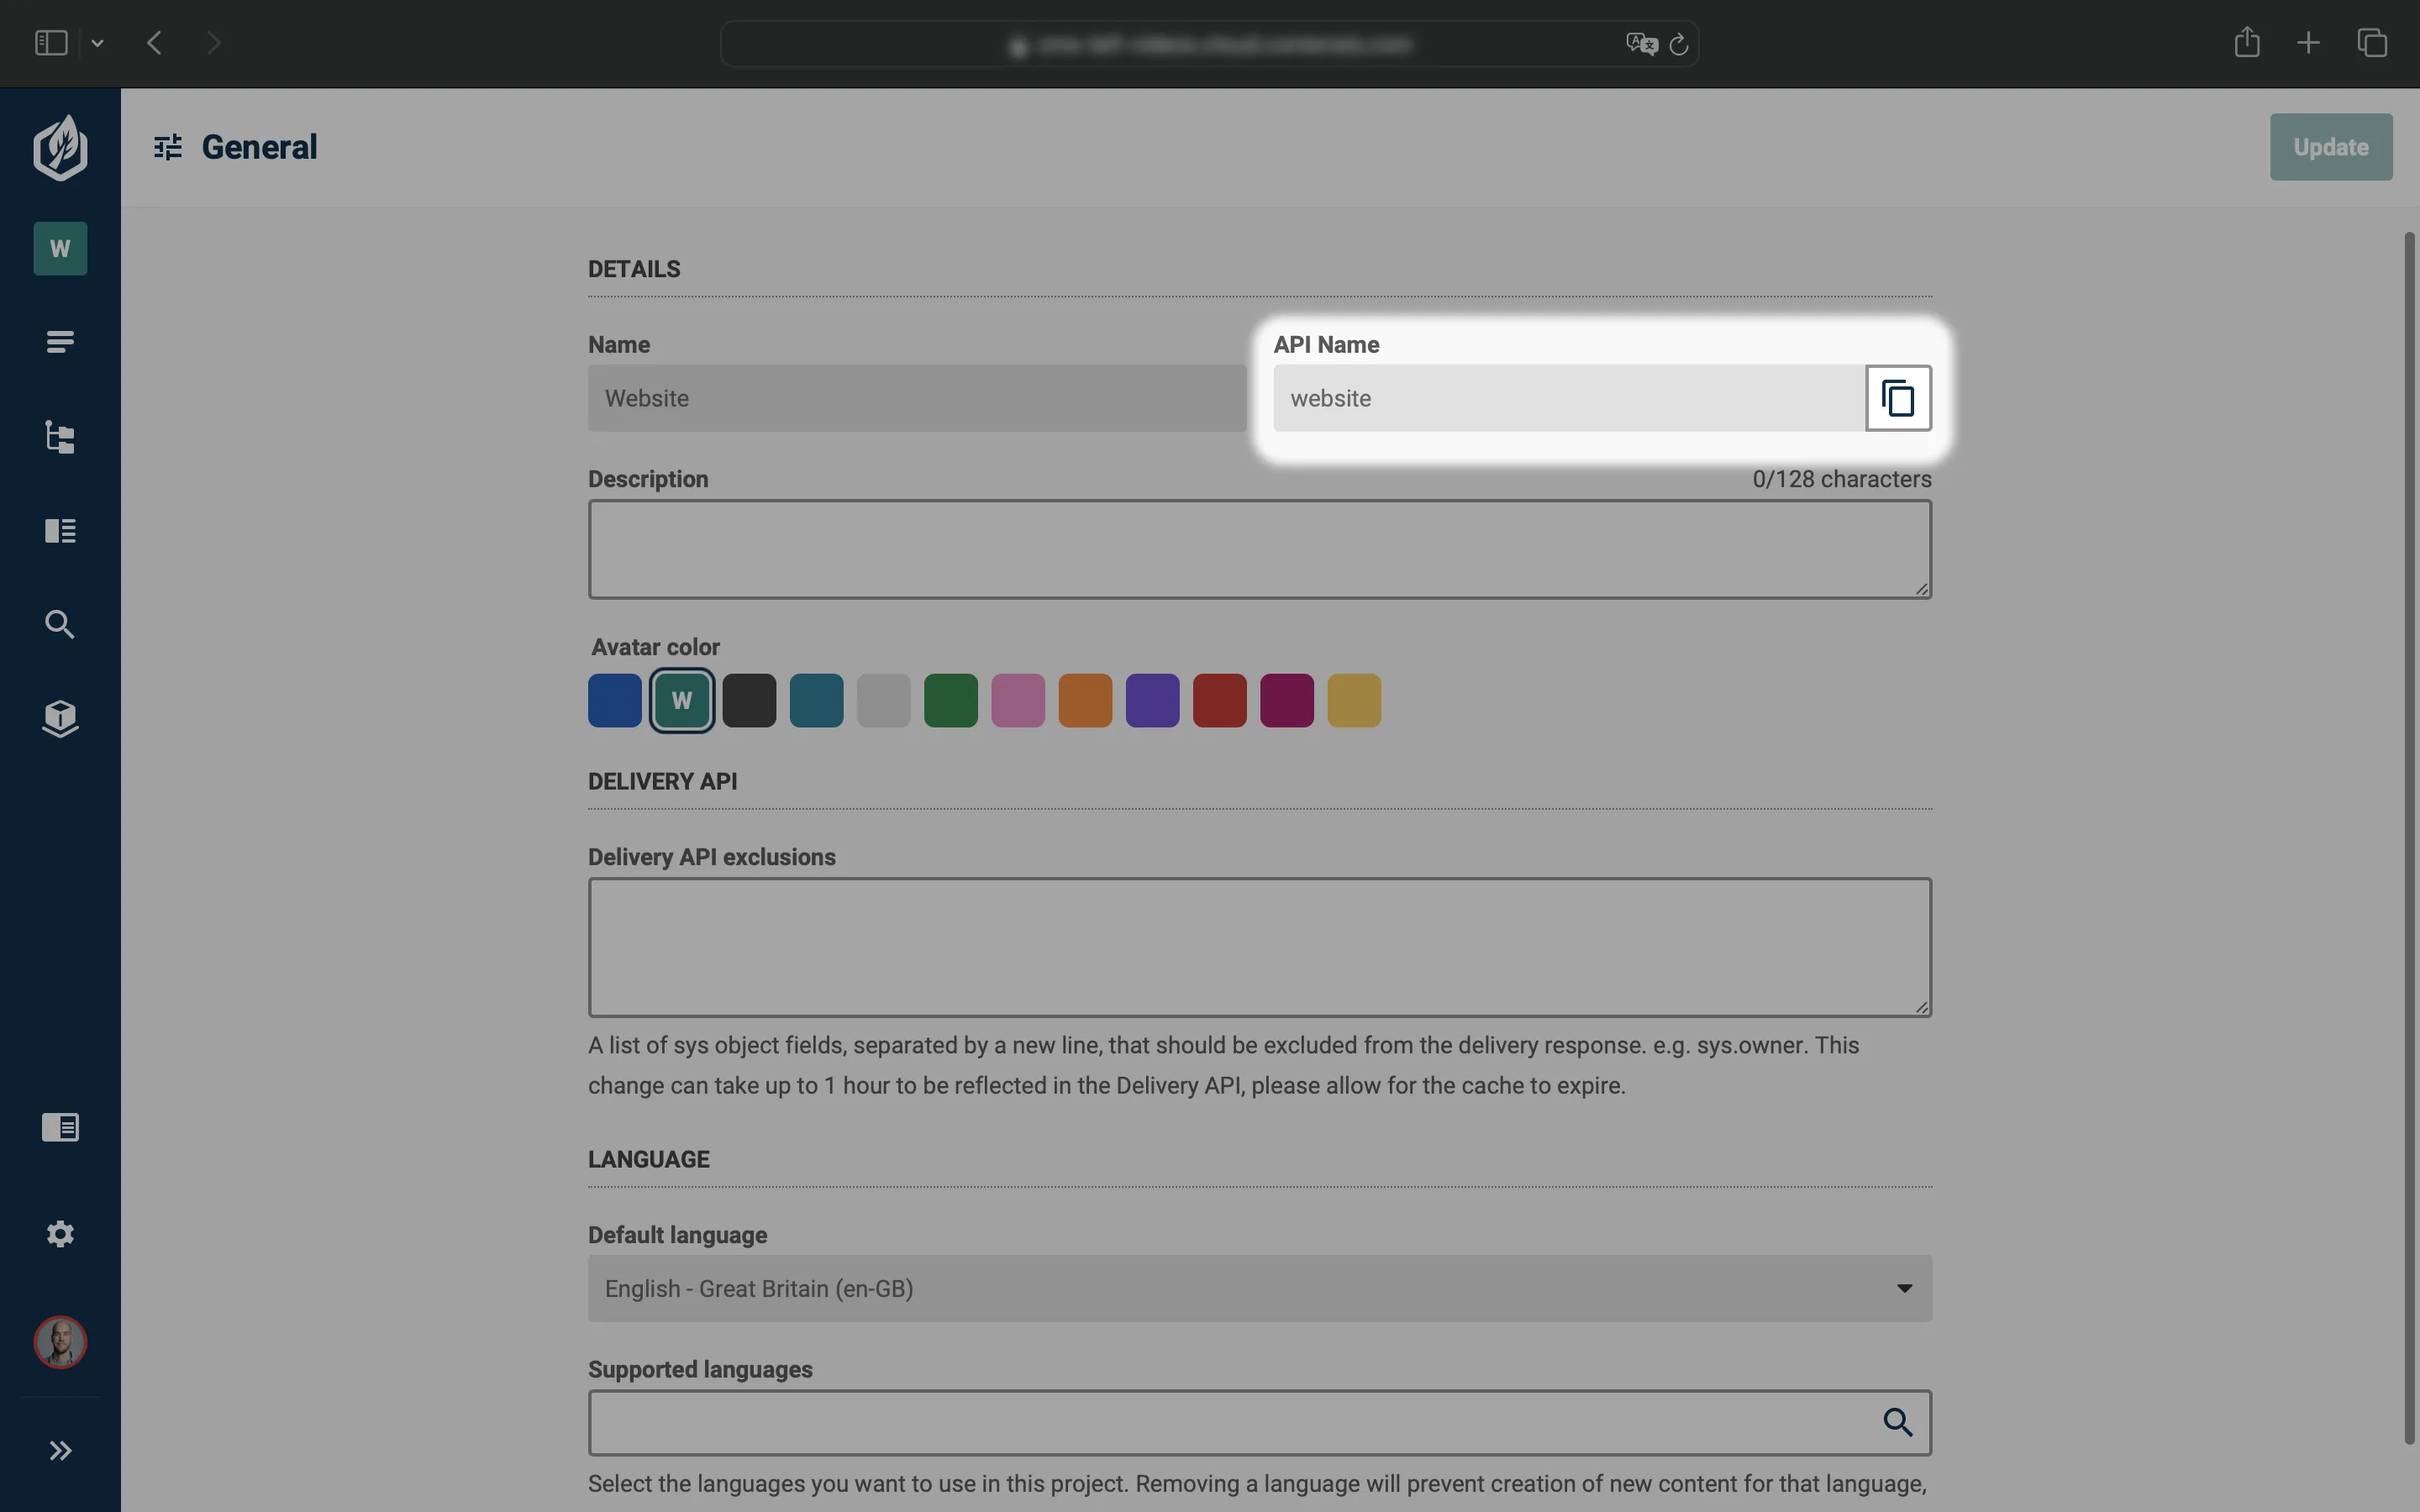
1. Locate your PROJECT_API_ID by navigating to Settings > General – look for the API Name section to find the unique identifier.
2. Next, determine your ALIAS by examining your CMS URL, for instance, cms-leif.cloud.contensis.com. Extract the part that follows cms-. In this example, the ALIAS would be 'leif'.
3. Now we need to update the .env file to store our PROJECT_API_ID and ALIAS. Copy the following code snippet and paste it underneath your client secret in the .env file. Ensure you update the placeholders in the snippet to match your own PROJECT_API_ID and ALIAS:
PROJECT_API_ID= {yourProjectId}

ALIAS= {yourAlias}
Setting up API key roles and permissions 🤝
Now that we've created our API key, we need to assign it to a role so we can grant it permission to create and publish entries. Follow the steps below to set up your role.
- First, navigate to your CMS and go to Settings > Roles.
- Press New role.
- Give your role a meaningful and descriptive name. It's also good practice to add a description to help you or your team members remember what your role is for, but it's not essential for this demo.
- We now need to assign the API key we created in the previous step to this role. With the role open, press the API keys tab. Use the search box to find the API key you created earlier and press it to add it to the role.
- Press Save to confirm your changes.
- In order for our API key to create and publish entries, we need to add some permissions to this new role. With the role open for editing, go to the Permissions tab. Select Entries from the toolbox on the left.
- Enable the
CreateandSave / Publishoptions in the Basic Workflow section of the Permissions panel on the right of the screen. - Press Save to apply the configured permissions.
Creating our first Content Type 🎨
Before we can look into creating an entry using .Net management API, we need to create a content type. A content type defines the structure of the content we'll be working with. Follow the steps below to create your first content type.
- Open your CMS.
- Navigate to Content Modelling > Content Types in the sidebar.
- Press the New content type button located in the top right-hand corner of the screen.
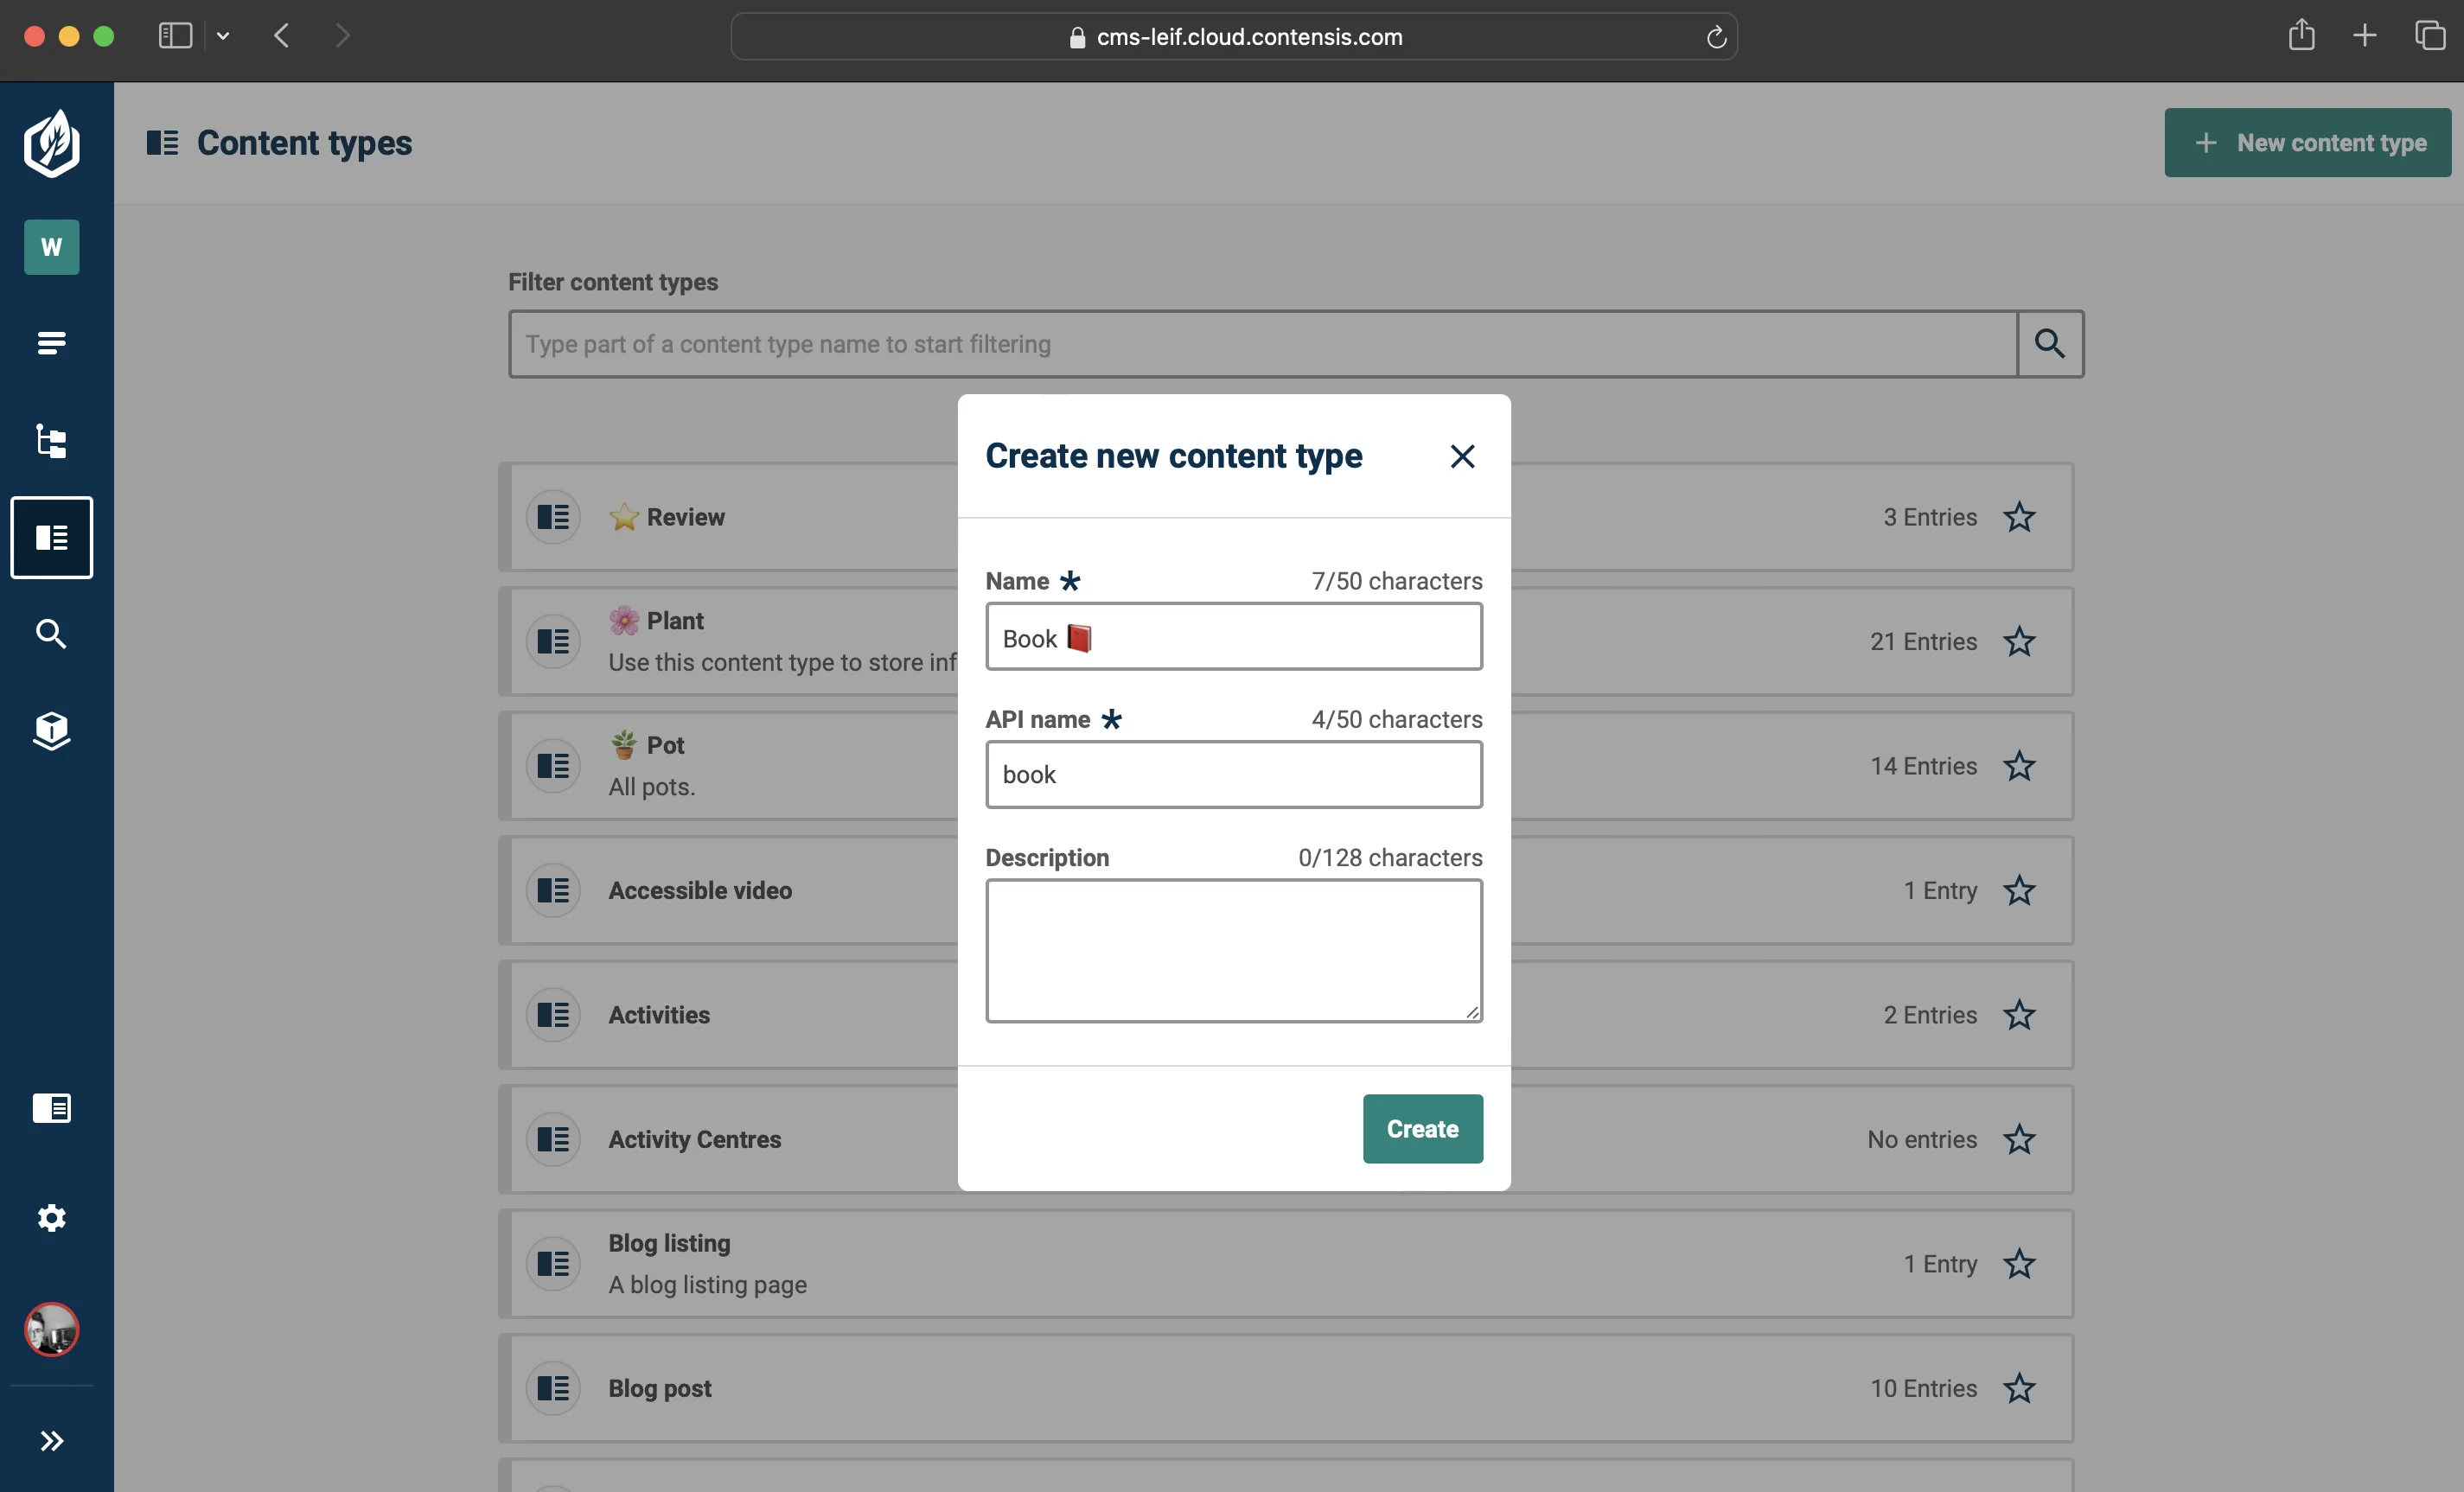
- Name this new content type 'Book 📕'. Take note of its API name – you'll need it later on.
- Press Create.
- Once the content type is created, the Content type builder will open so you can start adding fields to your content type.
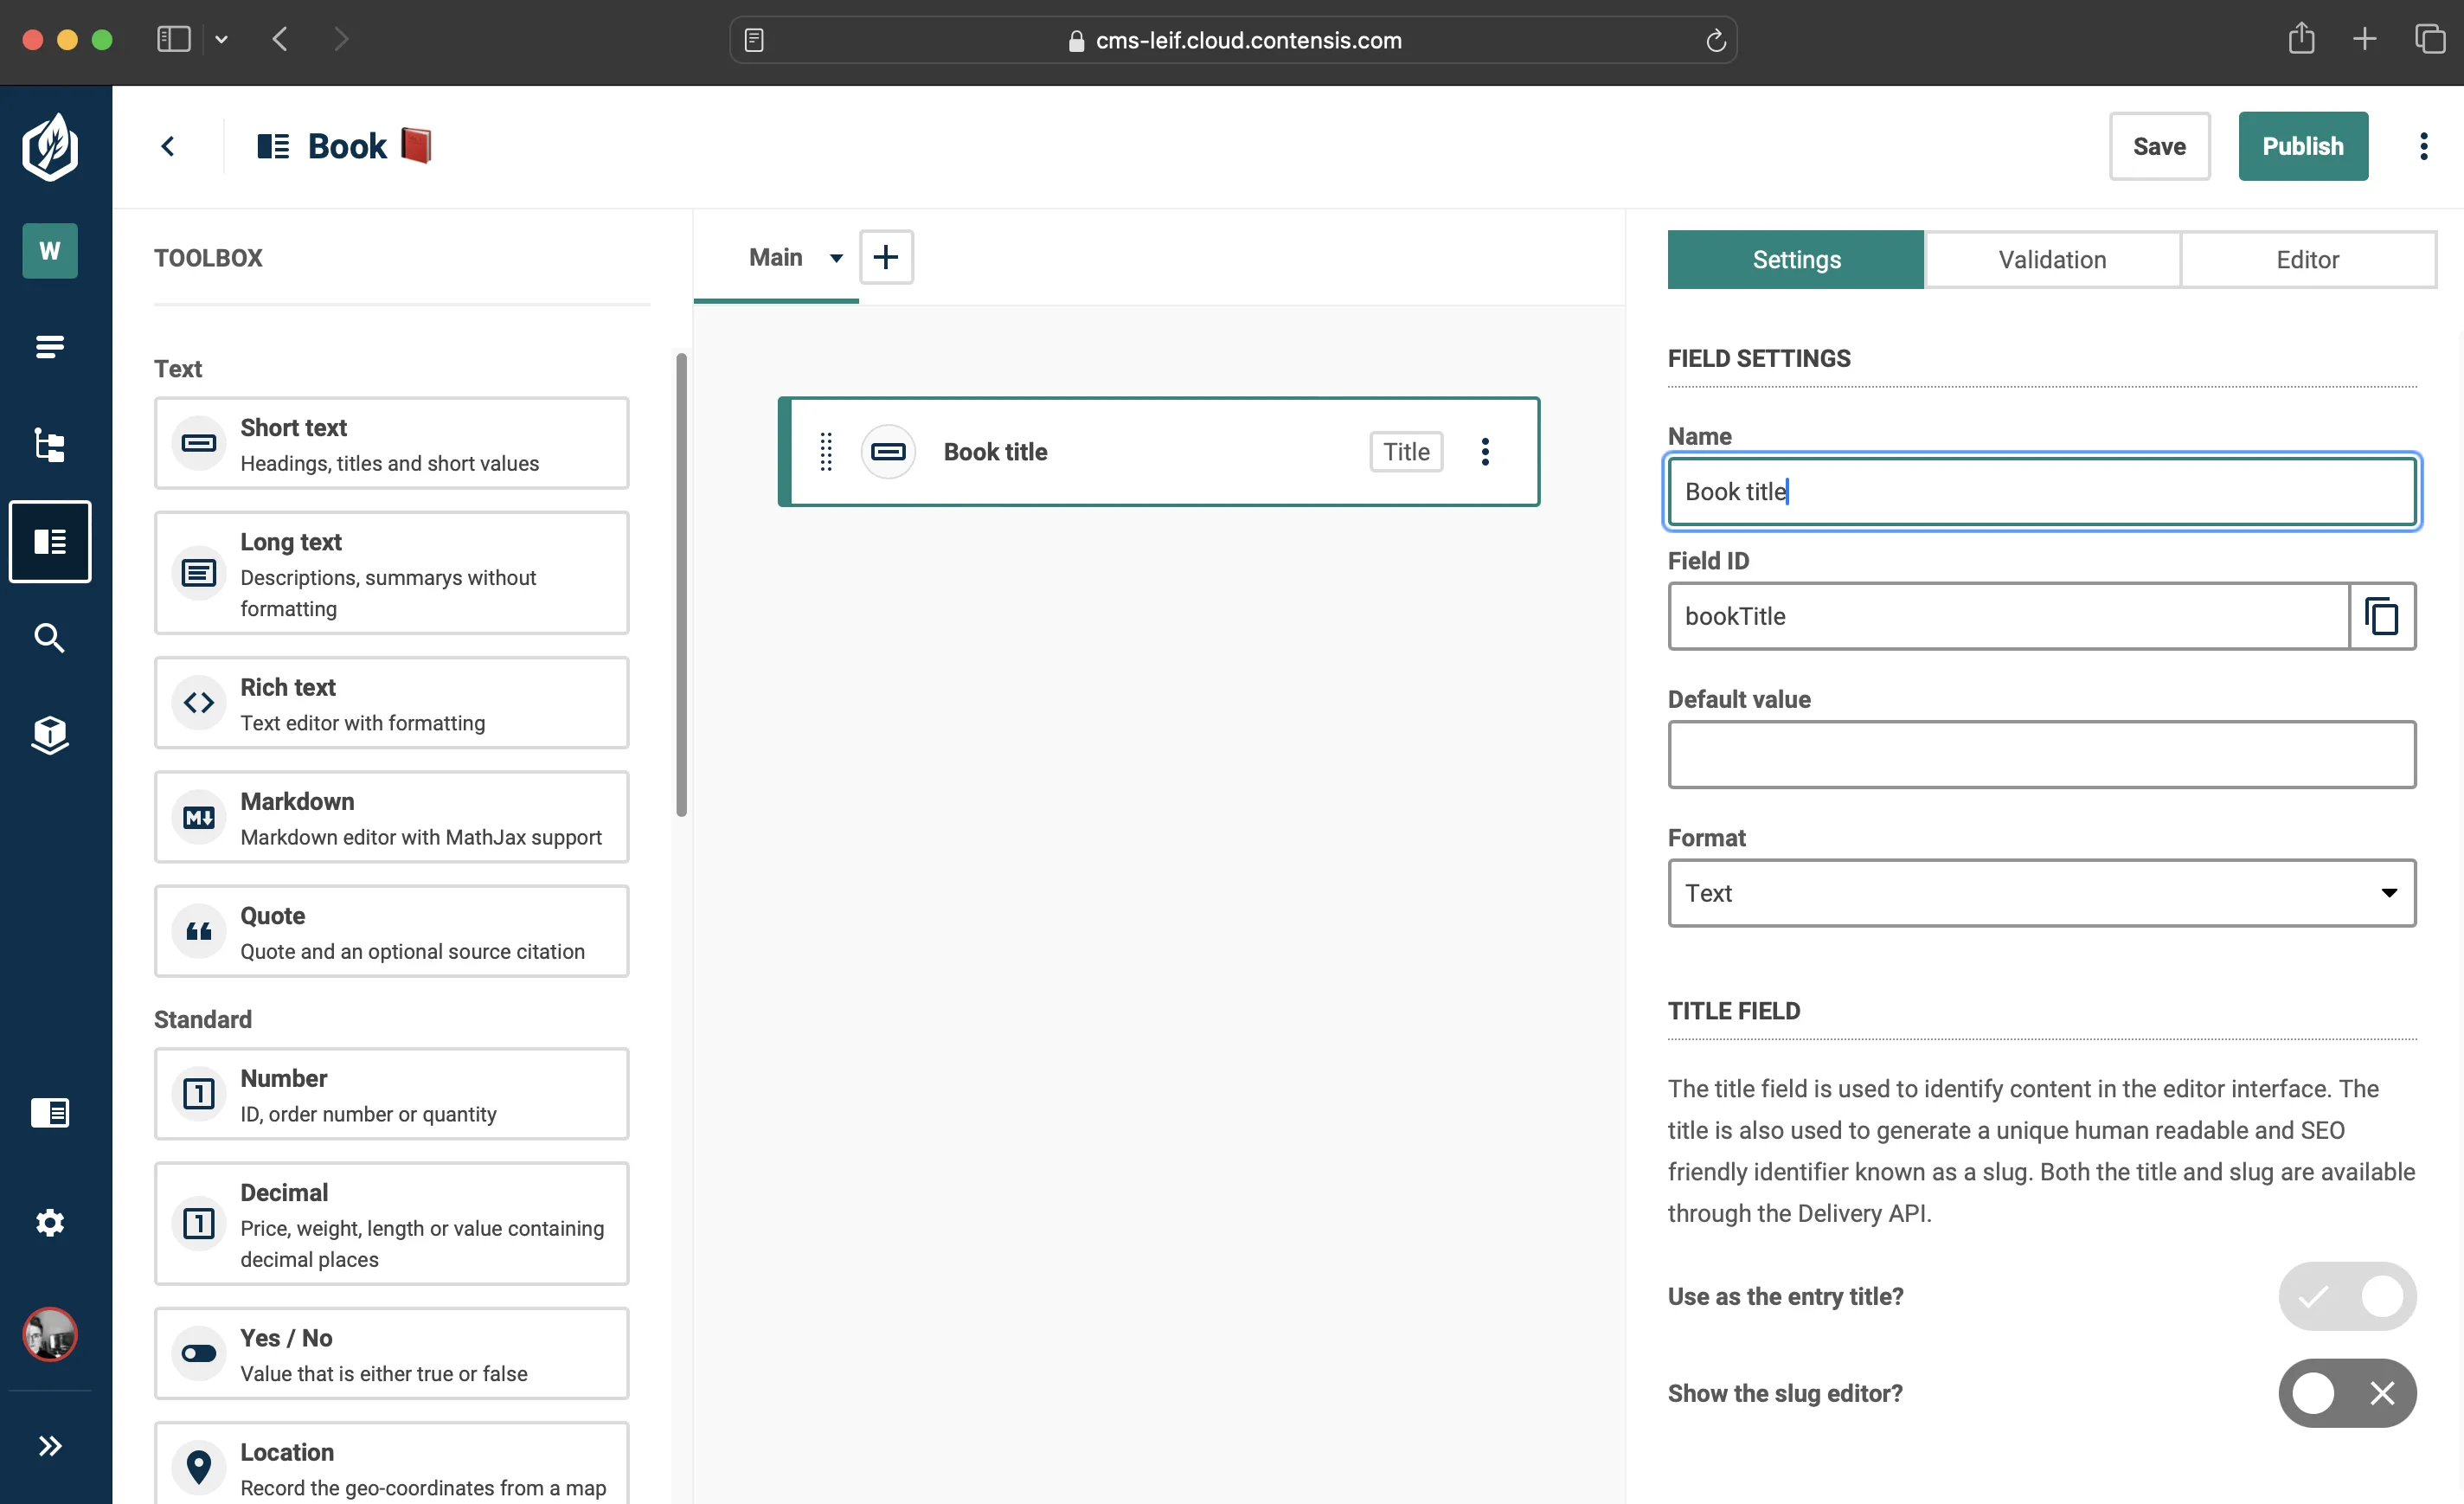
- Add a Short text field and change its field name to 'Book title'. Remember to jot down its Field ID for future reference.
- Press Save and then Publish to make the content type available for use.
Congratulations! You've just successfully created your very first content type 🎉.
Creating our first Entry 📝
Now that we've created a content type, we can use it to create entries with our application. Let's begin by retrieving our project. Add the following snippet to your Program.cs file:
// Retrieve Project
var myProject = client.Projects.Get(DotNetEnv.Env.GetString("PROJECT_API_ID"));
After retrieving our project, we're all set to create our entry. Don't forget to insert the content type ID we noted earlier within the parentheses, like this: Entries.New("book")
// Create Entry
var entryBook = myProject.Entries.New("book");
We created a 'Book title' field in our content type. Let's fill it in. We can do this by using .Set("bookTitle", "Some title here"). Remember to substitute 'bookTitle' with the field ID we noted earlier.
 // Set Fields
entryBook.Set("bookTitle", "How not to kill your houseplants 🌱");
To save our entry, use the following code snippet by calling .Save() on our entryBook variable. The code snippet features a Console.WriteLine() that is enclosed within a try-catch block to confirm the successful creation of the entry. Additionally, there's error handling incorporated to make you aware of any potential issues that may arise.
// Save Entry
        try
        {
            entryBook.Save();
            Console.WriteLine("Successfully Created Entry!");
        }
        catch (Exception ex)
        {
            Console.WriteLine("An unexpected error occurred: " + ex.Message);
        }
The contents of your Program.cs file should now look like this:
using System;
using Zengenti.Contensis.Management;
using DotNetEnv;


namespace CreateEntries
{
    class Program
    {
        static void Main()
        {

        // Load the .env file into environment variables
        DotNetEnv.Env.Load();

        // Client Initlisation
        var client = ManagementClient.Create(
            rootUrl: string.Format("https://api-{0}.cloud.contensis.com", DotNetEnv.Env.GetString("ALIAS")),
            clientId: DotNetEnv.Env.GetString("CLIENT_ID"),
            sharedSecret: DotNetEnv.Env.GetString("CLIENT_SECRET")
        );

        // Retrieve Project
        var myProject = client.Projects.Get(DotNetEnv.Env.GetString("PROJECT_API_ID"));

        // Create Entry
        var entryBook = myProject.Entries.New("book");
        // Set Fields
        entryBook.Set("bookTitle", "How not to kill your houseplants 🌱");
        // Save Entry
        try
        {
            entryBook.Save();
            Console.WriteLine("Successfully Created Entry!");
        }
        catch (Exception ex)
        {
            Console.WriteLine("An unexpected error occurred: " + ex.Message);
        }

    }
}
}
To run your .NET app, enter dotnet run in the terminal. If it runs successfully, you'll see the 'Successfully Created Entry!' log in the console.
To verify your entry has been created, return to your CMS and navigate to the entry listing screen. Your new entry should be visible there.
Nice! You've created an entry using Contensis's .Net Management API! 🥳