Introducing Blocks – a new way to build headless websites

Headless CMS platforms are transforming the way that we manage our content. By separating content and presentation, they make content available to any platform, provide a streamlined editorial experience, and slash development times.
However, these benefits have come with a cost.
The code that runs the presentation layer of any headless website or app is stored in separate systems that are often only visible to the developers working on the product. This can take the control out of the hands of site owners and create communication barriers between teams that hamper agile working.
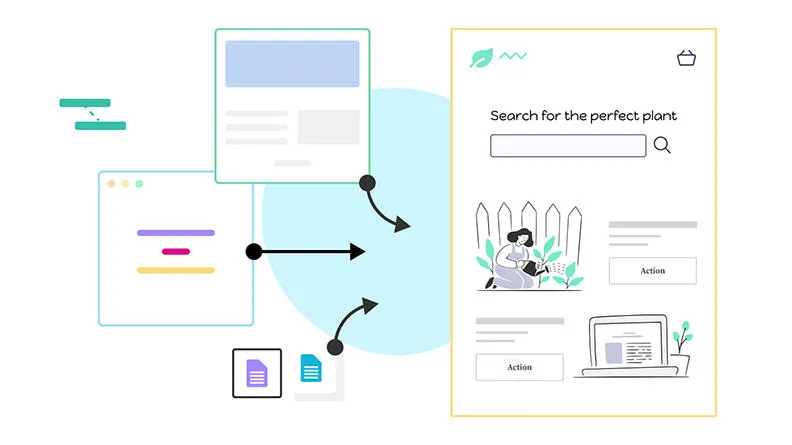
Today we're announcing Blocks – a new way for developers to package and deliver code, whilst managing the release of that code through the familiarity of the Contensis interface.
Blocks allows site owners and distributed teams to control the release of new features to their site. Developers can focus on writing code, commit any changes and make them visible on a preview URL. Then you and your team can preview and compare changes, go live, and have the peace of mind that you can roll back at any time.
Blocks
A Block is a package of code built as a Docker image, that runs on our cloud infrastructure, allowing your site owners to deploy and manage your code from the Contensis interface.
Each Block contains your application or service and all the dependencies required to run it. Not only does this let you develop in any language, but it also means that your code will work the same way in your production environment as it does when you are developing locally.
You can easily package and deploy code to Contensis as Blocks without leaving your IDE. There's no need to understand Kubernetes, container orchestration, or how to manage environments across multiple datacentres – Contensis handles that for you.
Deliver your entire site as a single autoscaling Block
A Block can be as big or as small as you like. It could contain a single discreet service, like a CRM integration, or power an entire website.
If you currently maintain your Contensis website's codebase in a single repository, you can deploy it as a Block in minutes.
And, because Blocks benefit from autoscaling technology, you'll never have to worry about your application becoming overwhelmed or struggling for resources. So when your profile blows up, your website won't.
Separate your code base into individual Blocks
Suppose you manage a particularly large or complex website with many interconnected components and services. You might have marketing pages, a staff directory, an events booking system, and an online store.
In that case, you can also choose to separate your codebase into individual Blocks, each running a different component or service from its own repository and potentially being managed and deployed by a separate team.
So, for example, your marketing pages, eCommerce functionality, and CRM integration could all be developed by teams on opposite sides of the world – each developing in different languages, maintaining code in separate repositories and pushing changes for you to release through Contensis when you're ready.
Preview a Block
Once a Block version is pushed to Contensis and becomes available in the dashboard, you can use our new preview toolbar to see how your code works with your latest draft or published content before you make it live on your production site.
The preview toolbar lets you switch branches, preview different Block versions, and even see how combining versions of multiple Blocks affects your site. If you want to check how the preview works on your phone or another mobile device, scan the QR code on the toolbar with your device to open the link.
When you're ready, you can share your preview configuration with your team members and other stakeholders for their feedback. Spinning up a local version of your code for sprint review is a thing of the past. Simply work directly on a feature branch and share the preview link with your colleagues.
Take control of code releases
Blocks allow you to release new code inside of Contensis – leaving site owners in control of releases and allowing developers to commit changes as soon as they are ready.
Like other Block actions, making a Block live can only be performed by users who belong to a role with that specific permission. This allows your wider team and stakeholders to view changes while ensuring that only product managers or site owners can make changes live when they are happy.
Of course, if you prefer to run a continuous deployment pipeline and release code as soon as it passes tests, without any manual intervention, you can do that too.
Roll back a Block
We all make mistakes from time to time. If a bug does slip through your testing, we store every Block's change history, making it possible to revert to a previous version at any time.
So, if you notice an issue with a live Block, you can mark it as broken and roll back to an older working version from inside Contensis without a developer's help.
Being able to roll back changes quickly minimises the downtime caused by bugs, removes the stress from releasing new features, and does away with the need for complicated change management processes. So, you can release new features faster and gather feedback from your users more frequently – increasing your team's effectiveness.
Enabling collaborative agile working
In a time when more and more of us are working remotely, we hope that having a single platform for managing content and code will provide you and your teams with a unified experience that takes the pain out of agile delivery.
Blocks is one of the most significant changes to Contensis since the introduction of content types and entries in Contensis 9. Like content types and entries and API-first websites, we believe Blocks represents the future of web product management.
In the same way that we continue to improve content types and entries, we'll be building upon this initial set of Blocks features to ensure Contensis remains at the forefront of enterprise content management well into the future.
Proxies
Migrating an existing website over to a new platform can be a daunting task. Sometimes it's best to do it iteratively – rebuilding the most important parts of your existing site on your new platform one area at a time. One way of doing this is through reverse proxies.
A reverse proxy allows an organisation to direct its site visitors to one or more website instances while making them appear as though they're on the same domain as another existing website.
For some time, you’ve been able to create reverse proxies in our separate SaaS dashboard. This wasn’t ideal as it meant using an unfamiliar interface that wasn’t subject to your existing roles and permissions and that didn’t integrate with other Contensis features, such as Site View.
We’ve now brought reverse proxies into Contensis. These are accessed through the settings area of the sidebar and are subject to your project’s roles and permissions. Reverse proxies now also work with Site View, removing the need to manually enter the source URL and reducing the chance of errors.
Reverse proxies can also help you to make the switch from Contensis Classic to using content types and entries with Site View. To make this even easier, if your new site is built using Blocks, you can continue serving content from Contensis Classic and we’ll do all the routing for you automatically.
To learn more about reverse proxies, check out our latest user guides.
Entry thumbnail
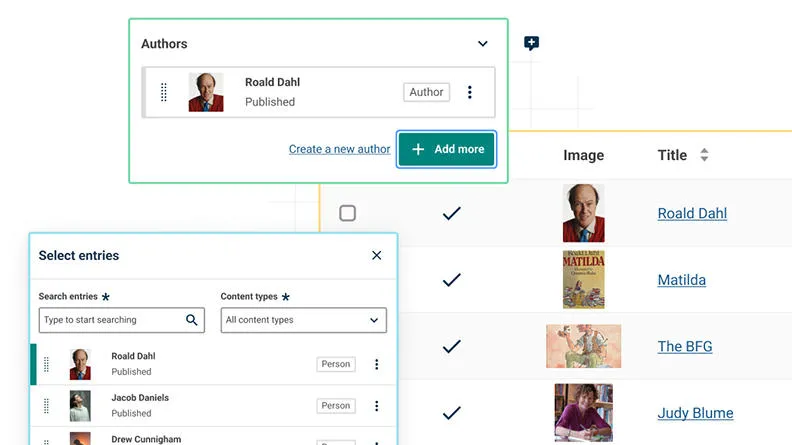
To make it easier to distinguish entries in the entries listing screen, any image field in a content type can now be set as an entry thumbnail. This thumbnail image will then be displayed in the entry listing as well as in any entry pickers which support entries of that content type.
This will help you visualise content relationships and make it easier to find content. It is especially useful where you have a lot of entries with an identifiable visual element, such as headshots for people entries, logos for company entries, or hero images for blog posts. Plus, it looks great!
To make life easier for developers, the entry thumbnail is also surfaced in the Delivery API alongside entryTitle and entryDescription without the need for an extra API call.
Favourites
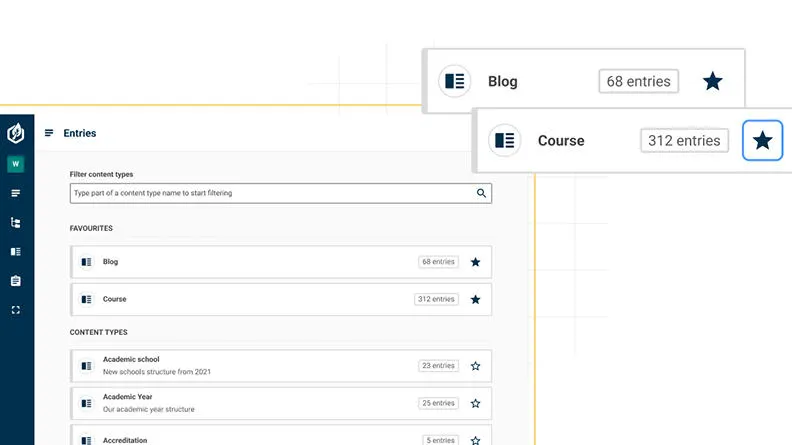
We’ve introduced favouriting to make it easier to quickly access your most frequently used resources.
You can now favourite content types you frequently use to create entries. When you create a new entry, your favourite content types will be displayed at the top of the list. This will help reduce the need to scroll or search for a specific type and should speed up the entry creation process.
You can also favourite the components and content types you most often use when modelling content. This is useful if you regularly work with specific areas of your organisation’s content model and want to simplify your view to focus on the resources that you use the most.
Finally, if you are working in an environment with a large number of projects, you can now favourite your most commonly used projects.
Updates to the authoring experience
Improved entry creation workflow
We’ve improved the authoring experience when creating multiple entries. When you are creating and publishing entries one after another, you now have the option to Publish and create another rather than going back to the entry editor after you publish each entry. This is great when you are creating and publishing a large number of entries and you don’t want to break your flow.
Tag entry picker
We’ve introduced a new tag entry picker field. This streamlined field takes up less space than the standard entry picker and is designed for linking to entries that are used as tags, categories, or keywords. The simplified field saves valuable screen space in the entry editor, helping to reduce scrolling.
Default images
Following on from the introduction of default entries in the last Contensis release, you can now set one or more default images for an image field. This image is then automatically populated when an author creates a new entry. An author can then leave the default image as it is or replace it with another image.
SVG and WebP upload support
We now support the uploading of SVG and WebP images to entries. Uploaded files will also be displayed in the image gallery.
While the Image API previously allowed you to convert JPEGs, PNGs and other image types into WebP, you couldn’t upload WebP images to Contensis directly.
Support for SVGs means that icons, logos, or any other vector-based illustrations can now be managed as image and asset content – making it easier to upload and insert them into entries.
Managed links
Site View links in rich text fields are now automatically updated when the location of the linked content is changed in the Site View tree.
Previously if you moved a node in the Site View tree, any existing links to that node would break and would return a 404 on your front-end pages.
We’ve updated the Content API so that if you change a node in the Site View tree, it will update and index your content accordingly.
Upgrade now
If you are a cloud customer, you can raise a support request today to schedule an upgrade to Contensis 15.4.
If you currently have a website that is running in containers on our app servers, we will automatically migrate your preview and staging sites to run on Blocks. You can then move your live site across to Blocks once you have tested and are happy with your staging site.
If you have a site that is running on Contensis Classic, this will remain unchanged.
If you are currently using an on-premise version of Contensis, and want to find out more about moving to our cloud platform and how you could benefit from Blocks, get in touch to arrange a call from your account manager.
